
Cosmetic Label Size and Dieline Library
A reference library of cosmetic label dimensions, dieline specs, and regulatory panel allocations organized by packaging format to size labels from container geometry before designing artwork.
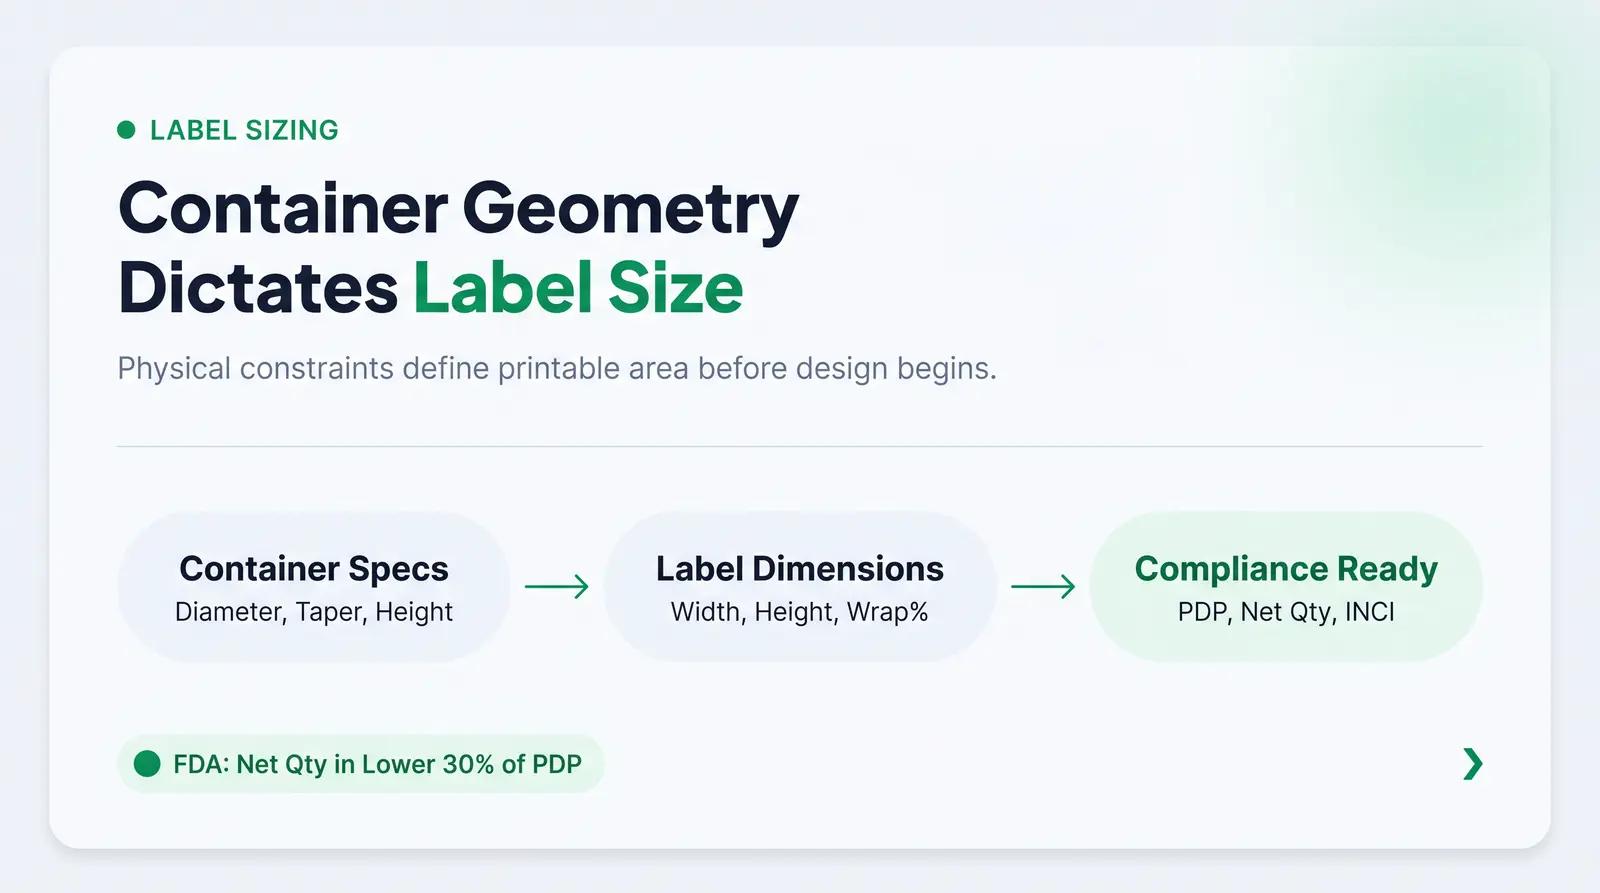
Label sizing is not a design decision. It is a geometry constraint. The container's diameter, taper, surface curvature, and regulatory print requirements determine what is physically printable before a designer opens a single file. That means the label is not a creative starting point—it is the outcome of a set of measurements. Getting those measurements right before briefing a designer is what separates a smooth launch from a reprint, a compliance failure, or a wasted production run.
This article is a working reference library organized by packaging format. Use it to determine label dimensions, understand dieline structure, and allocate regulatory panels for any cosmetic primary packaging format before artwork begins.
Why Label Sizing Starts with the Container, Not the Designer
The geometry-first principle is straightforward: a cylindrical container's diameter determines its circumference, and the circumference determines the maximum printable label width. Taper, shoulder radius, and base margin further constrain the label height. Curved surfaces impose minimum panel widths to keep text legible without distortion. None of these constraints are negotiable—they are physical properties of the container.
When founders or designers guess label dimensions or rely on generic templates, the consequences compound quickly. Labels may overlap incorrectly, wrinkle on tapered surfaces, or fail to adhere at curved edges. More critically, incorrect sizing can lead to failed FDA compliance panels if mandatory information—such as the net quantity declaration—falls outside the required display zones. The FDA requires the net quantity to appear in the lower 30% of the principal display panel (PDP), which itself must be large enough to accommodate all required information with clarity [5]. A label that is too narrow or too tall can displace that content outside the compliant zone.
Precise label sizing bridges the gap between container geometry and print readiness. It is the first step in any packaging workflow, not a detail to be resolved after artwork is complete.
Core Dieline Concepts Every Beauty Founder Should Understand
Before calculating specific dimensions, it helps to understand the vocabulary of label printing. These terms appear on every print-ready file and every printer's specification sheet.
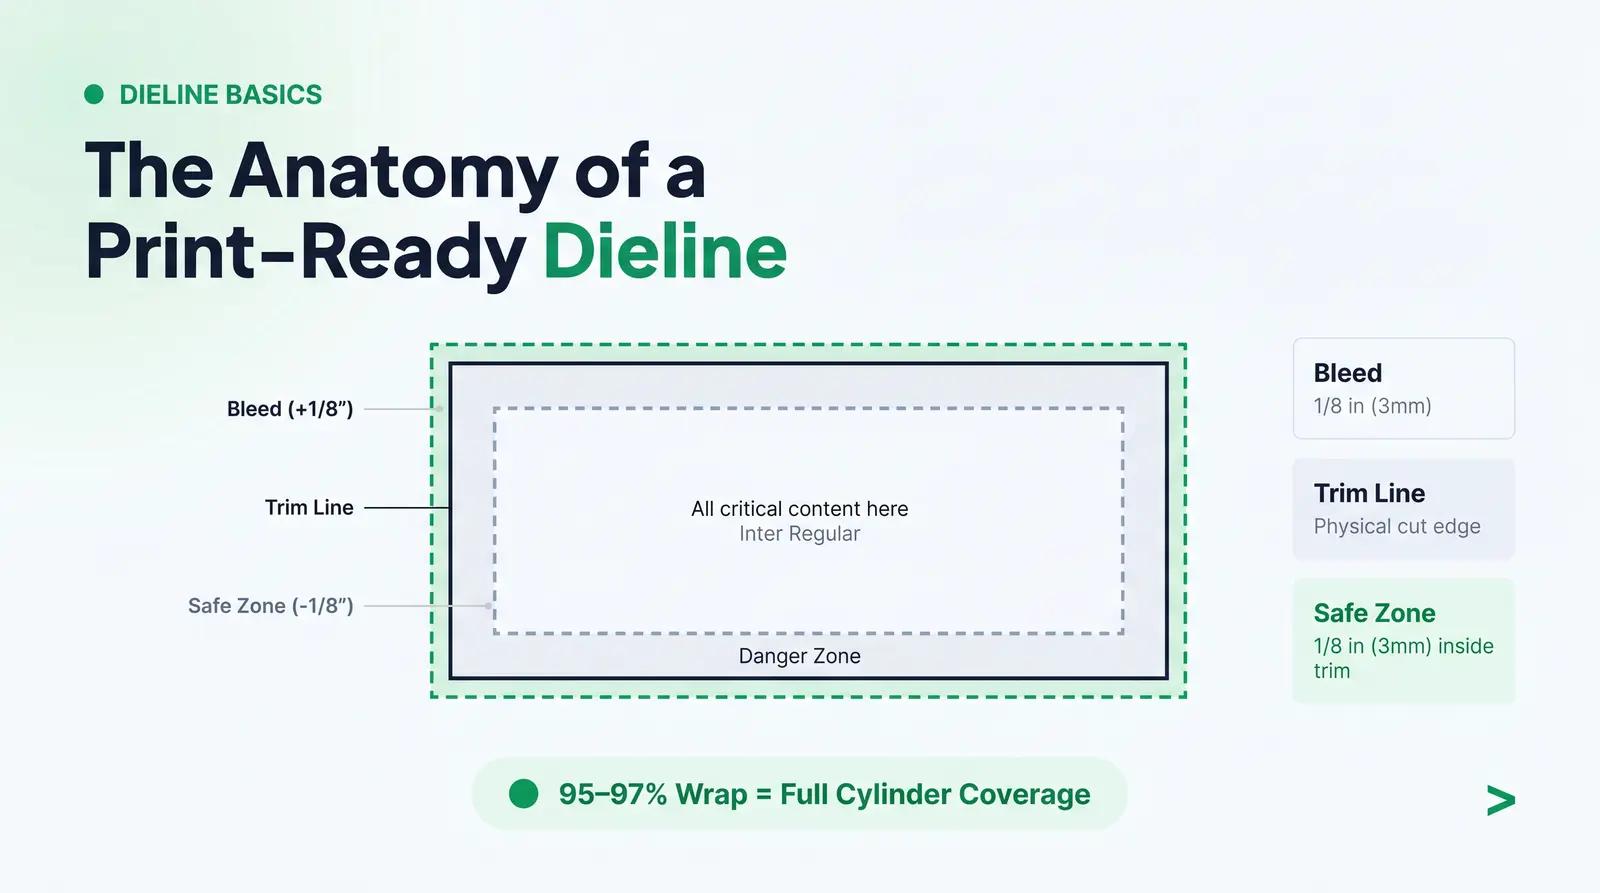
A dieline is the blueprint of the label—a vector outline showing the exact shape and size to be cut. It is the foundation of the print-ready file and the reference point for all artwork placement.
The trim line is where the label will be physically cut. The bleed is an extension of the artwork beyond the trim line—typically 1/8 in (3.175 mm)—ensuring that no white edges appear if the cut is slightly misaligned [1]. The safe zone (also called the live area) is an internal margin—also typically 1/8 in (3.175 mm) inside the trim line—where all critical text and graphics must remain to avoid being cut off or distorted near the edge [2].
Label configurations vary based on the container and design intent. A wraparound label covers the entire circumference of a cylinder, often with a small overlap gap. A panel label covers only a portion of the container's surface. A front-and-back label setup uses two separate labels applied to opposite sides. For cylindrical containers, calculating the label width requires determining the circumference (π × diameter) and applying a wrap percentage—typically 95–97% for a full wrap with a visible gap, or slightly over 100% for an overlap [3].
Understanding these concepts before briefing a designer or requesting a printer's template prevents misaligned artwork, wasted rounds of revision, and print runs that cannot be used.
Cosmetic Label Size and Dieline Library — Organized by Packaging Format
Serum / Dropper Bottles
Typical sizes range from 0.5 oz (15 ml) to 2 oz (60 ml), commonly in amber glass or PET cylinders. A standard 1 oz (30 ml) dropper bottle has a diameter of approximately 1.25 in (31.8 mm) [4].
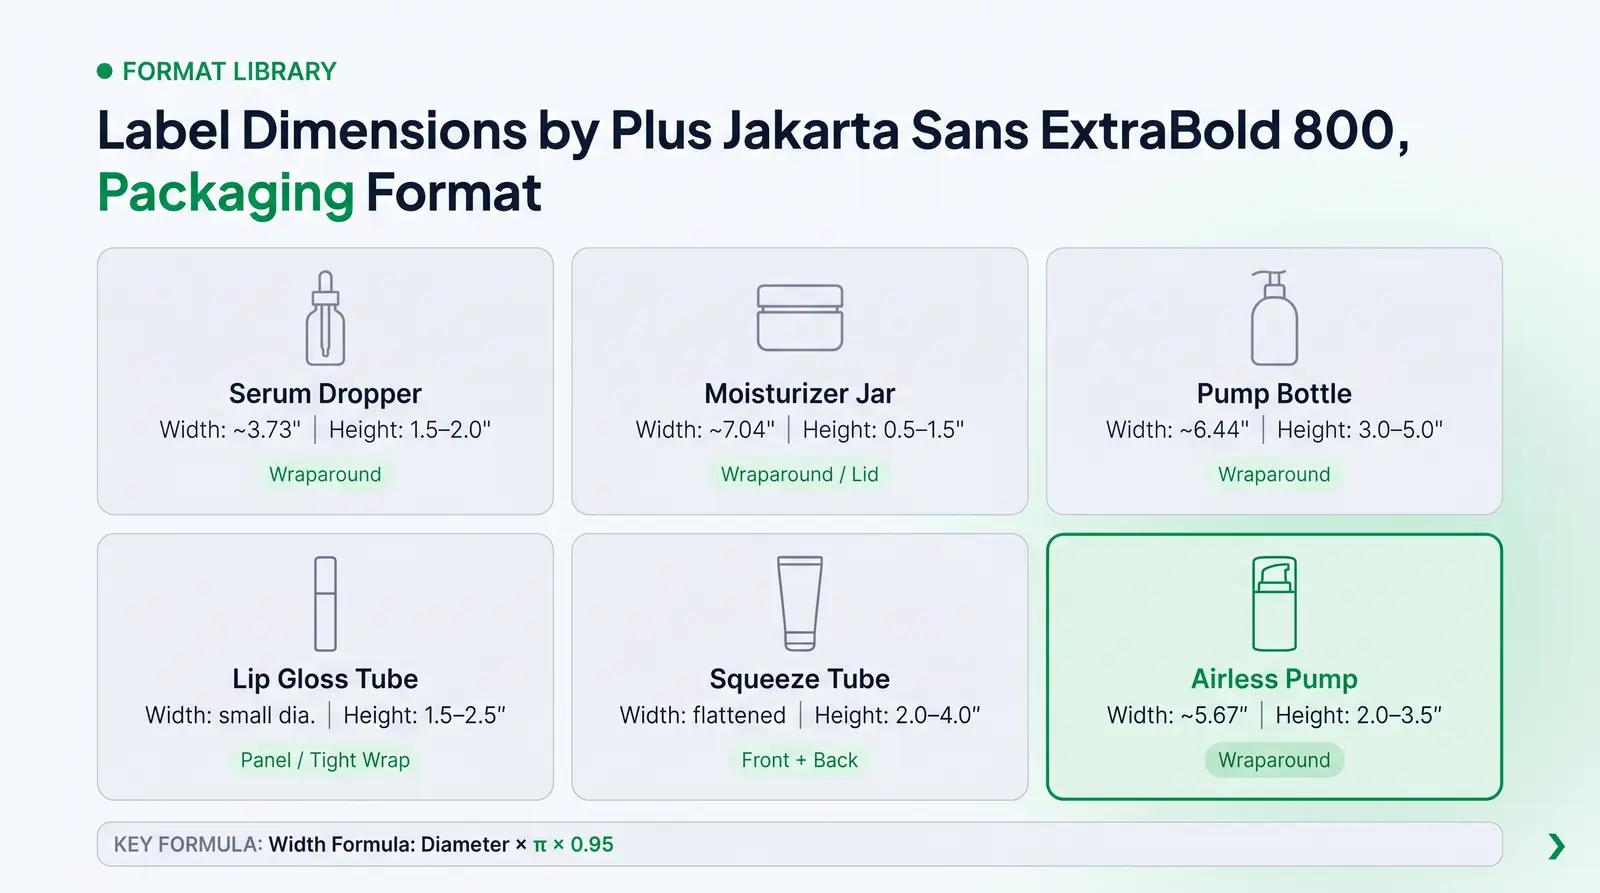
To calculate the label width, multiply the diameter by π (3.14) to find the circumference, then apply a 95% wrap percentage. For a 1 oz (30 ml) bottle: 1.25 in × 3.14 × 0.95 = 3.73 in (94.7 mm). Recommended label heights range from 1.5 in to 2.0 in (38–50 mm), accounting for shoulder clearance and base margin.
Common configurations include wraparound or front-and-back labels. Key dieline considerations involve leaving a 1/8 in (3 mm) bleed on all sides and a matching safe zone. Regulatory note: FDA requires the PDP on the front-facing panel, with the net quantity declaration in the lower 30% of the PDP [5].
Facial Moisturizer Jars
Typical sizes include 1 oz (30 ml), 2 oz (60 ml), and 4 oz (120 ml). A 2 oz (60 ml) jar often requires a label height of around 0.93 in (23.6 mm) to avoid the lid thread and base curve [6].
Label width is calculated from the jar's diameter. For a 60 mm diameter jar: 2.36 in × 3.14 × 0.95 = 7.04 in (178.8 mm) for a full wraparound. Recommended label height ranges from 0.5 in to 1.5 in (12–38 mm) depending on the jar's profile. Common configurations are wraparound labels or top lid labels. Dieline considerations must account for the jar's straight sides versus tapered bases—a taper requires a die-cut label with a curved top and bottom edge rather than a simple rectangle.
Body Lotion / Pump Bottles
Typical sizes are 4 oz (120 ml), 8 oz (240 ml), and 16 oz (480 ml). An 8 oz (240 ml) pump bottle typically has a diameter of 2.16 in (54.8 mm) [7].
For a full wraparound: 2.16 in × 3.14 × 0.95 = 6.44 in (163.6 mm). Recommended label heights range from 3.0 in to 5.0 in (76–127 mm). Common configurations include wraparound and front-and-back labels. Dieline considerations must ensure the label height clears the pump mechanism base and the bottle's bottom curve. Shrink sleeve labels are a viable alternative for bottles with significant taper or complex shoulder geometry.
Lip Gloss / Lip Oil Tubes
Typical sizes are 6 ml, 8 ml, and 10 ml. These small cylinders require precise label dimensions. Label width is calculated from the small diameter. Recommended label heights range from 1.5 in to 2.5 in (38–63 mm).
Common configurations are small panel labels or tight wraparounds. Key dieline considerations include a strict safe zone, as text can easily wrap out of view on small diameters. Minimum font sizes for ingredient INCI names—1/16 in (1.6 mm) for standard packages, or 1/32 in (0.8 mm) for packages with less than 12 square inches of total surface area—must be strictly observed [8].
Cosmetic Tubes / Squeeze Tubes
Typical sizes range from 1 oz (30 ml) to 3.4 oz (100 ml). A 1 oz (30 ml) tube typically has a 1.0 in (25 mm) diameter, while a 2 oz (60 ml) tube has a 1.37 in (35 mm) diameter [9].
For squeeze tubes, label width is typically based on the flattened width of the tube. Recommended label heights range from 2.0 in to 4.0 in (50–101 mm). Common configurations include front-and-back labels or full wraparounds. Key dieline considerations involve the crimp seal at the bottom, which cannot be labeled over, and the shoulder taper near the cap, which restricts the usable label height.
Airless Pump Bottles
Typical sizes are 15 ml, 30 ml, and 50 ml. A 50 ml airless pump bottle typically has a diameter of 1.90 in (48.5 mm) [10].
For a full wraparound: 1.90 in × 3.14 × 0.95 = 5.67 in (144.0 mm). Recommended label heights range from 2.0 in to 3.5 in (50–89 mm). Common configurations are wraparound labels. Dieline considerations must account for the internal piston mechanism visibility if the bottle is clear, often requiring opaque labels or strategic cutouts to avoid revealing the piston position.
Foundation / Concealer Bottles
Typical sizes are 1 oz (30 ml) and 1.7 oz (50 ml). These bottles often feature thick glass bases and distinct shoulders. Label width is calculated from the printable cylindrical area, excluding the shoulder taper and base curve.
Recommended label heights range from 1.0 in to 2.0 in (25–50 mm). Common configurations are small front panels or front-and-back labels. Key dieline considerations include avoiding the thick glass base area where curvature begins, which can cause label lifting or wrinkling.
Toner / Mist Spray Bottles
Typical sizes are 3.4 oz (100 ml) and 6.7 oz (200 ml). Label width is calculated from the circumference. Recommended label heights range from 3.0 in to 5.0 in (76–127 mm).
Common configurations are wraparound labels. Dieline considerations must ensure the label height clears the spray nozzle collar and base curve. For mist bottles with a significant taper, a die-cut label with a curved top edge is required rather than a rectangular label.
The Label-Ready Checklist: From Container Spec to Print-Ready File
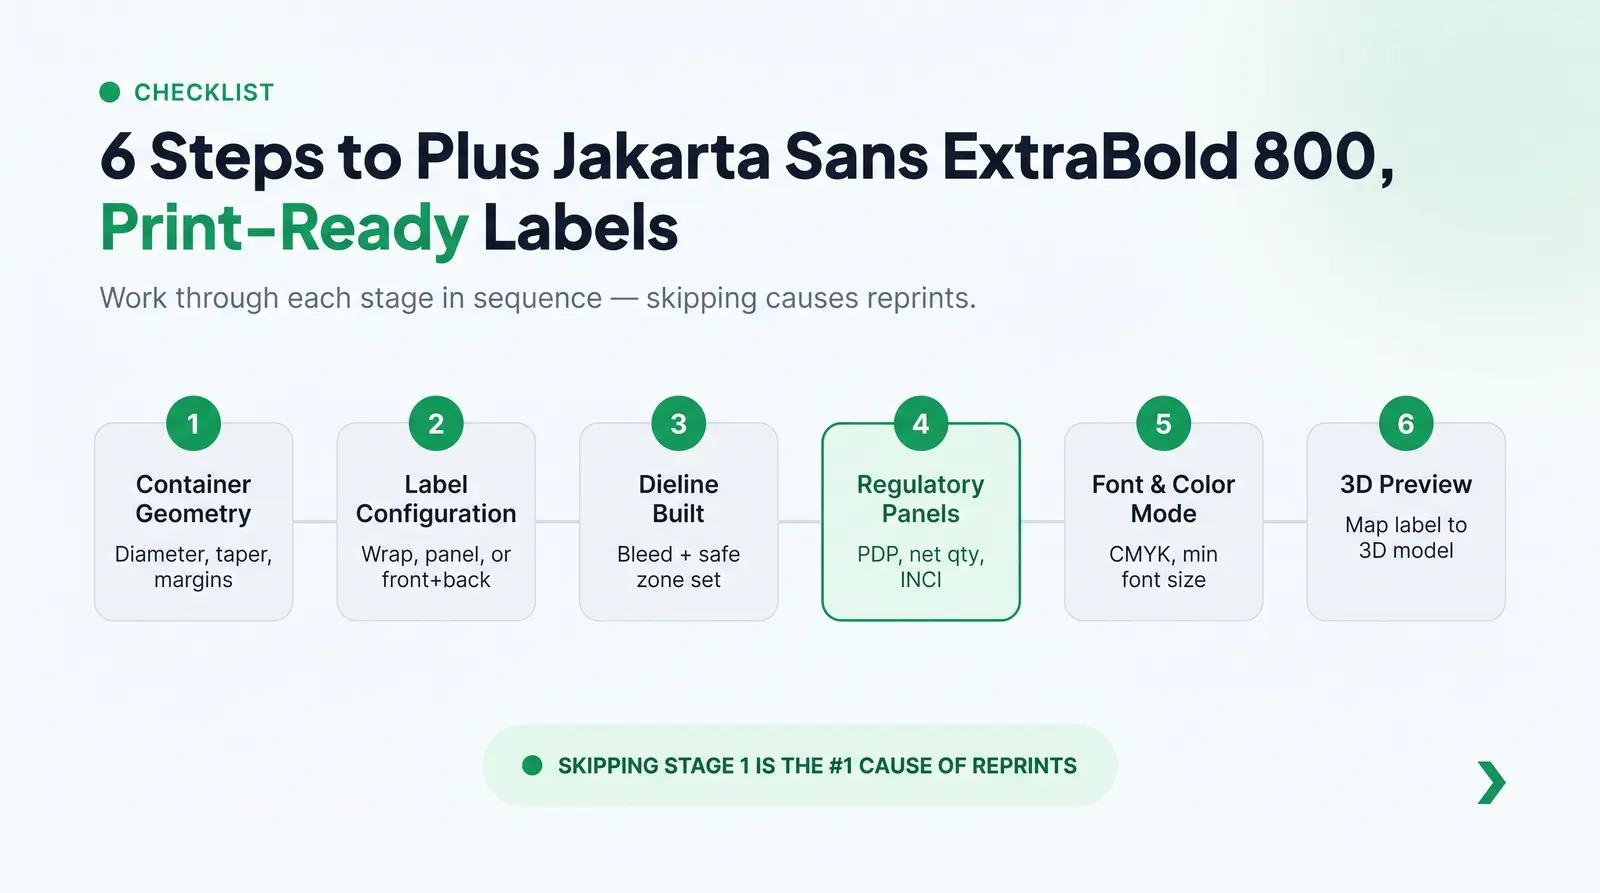
The Label-Ready Checklist is a practical framework we recommend at Packfolio before any artwork file goes to print. Work through each stage in sequence—skipping a stage is the most common cause of a reprint.
| Stage | Action Required |
|---|---|
| Stage 1: Container Geometry Confirmed | Diameter measured, taper noted, shoulder and base margins defined. |
| Stage 2: Label Configuration Chosen | Wraparound, panel, or front + back configuration selected based on container geometry and design intent. |
| Stage 3: Dieline Built | Bleed set at 1/8 in (3 mm), safe zone set at 1/8 in (3 mm) inside trim line, trim line confirmed, overlap gap defined for wraparound. |
| Stage 4: Regulatory Panels Allocated | PDP identified, net quantity position confirmed in lower 30% of PDP, ingredient list panel allocated, MoCRA/FDA required statements placed. |
| Stage 5: Font and Color Mode Verified | Minimum font size for ingredient INCI names verified (1/16 in standard, 1/32 in for small packages), CMYK vs. Pantone confirmed with printer, white ink underlay noted for clear labels. |
| Stage 6: Print Proof Reviewed on 3D Preview | Label mapped to 3D model to verify visual alignment before committing to a print run. |
Why Designing for the Label First Is a Costly Mistake
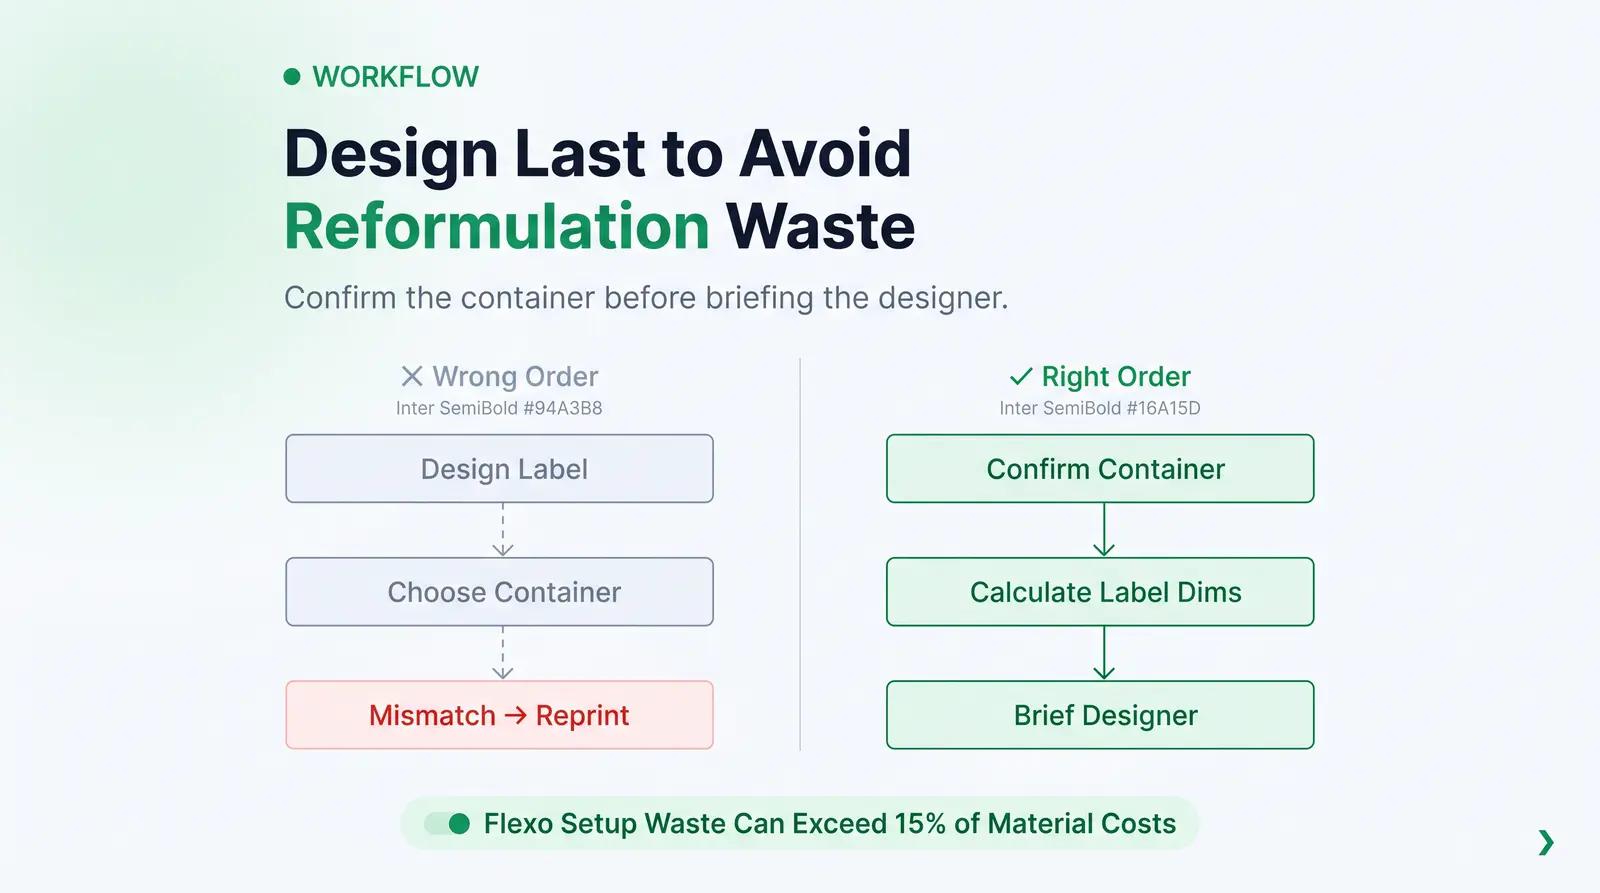
Here is a non-obvious insight that affects more indie launches than most founders realize: designing the label before confirming the container is a leading cause of reformulation-driven packaging waste.
The sequence matters. When a brand selects a container after the label is designed, the label dimensions often do not match the container's printable area. The founder then faces a choice: reprint the labels (cost), redesign the artwork (time), or switch containers (which may require reformulating the product to match a different fill volume). Each option is expensive.
The economics of short-run digital label printing have made this problem more visible. Digital printing eliminates the need for custom plates, making it cost-effective for short runs and quick design changes [11]. Flexographic printing, by contrast, requires upfront tooling costs and generates setup waste that can exceed 15% of material costs [11]. For indie brands, digital printing is the economically rational choice until volumes reach the tens of thousands of units per SKU—at which point the per-unit cost of flexographic printing begins to offset its setup costs. The practical implication: indie brands have the flexibility to reprint labels when dimensions are wrong, but the time and cost of doing so is still a meaningful drag on a launch. Getting the container geometry confirmed before the label is designed eliminates that risk entirely.
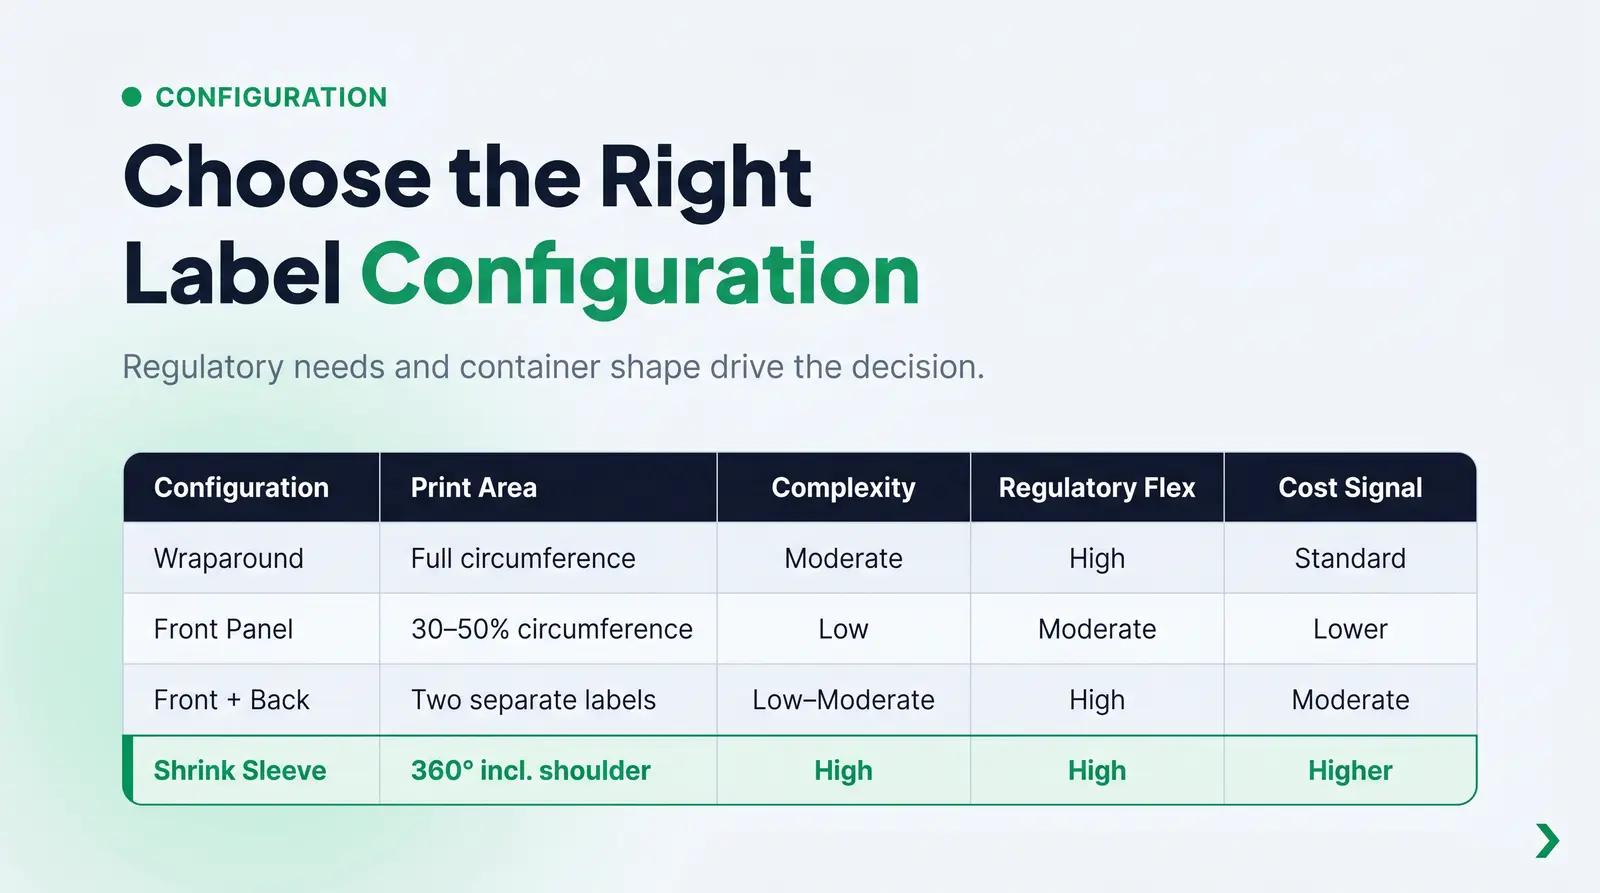
Label Configuration Comparison
| Configuration | Print Area | Design Complexity | Regulatory Flexibility | MOQ Implications | Cost Signal |
|---|---|---|---|---|---|
| Wraparound | Full circumference | Moderate: artwork must read correctly at all angles | High: full surface available for all required panels | No structural constraint | Standard |
| Front Panel | 30–50% of circumference | Low: single-face design | Moderate: may require back panel for ingredient list | No structural constraint | Lower per label |
| Front + Back | Two separate labels | Low-Moderate: two independent designs | High: clear panel separation for PDP and IP | Doubles label count | Moderate |
| Shrink Sleeve | 360 degrees including shoulder and base | High: requires 3D artwork mapping | High: full surface coverage | Higher MOQ typical | Higher unit cost |
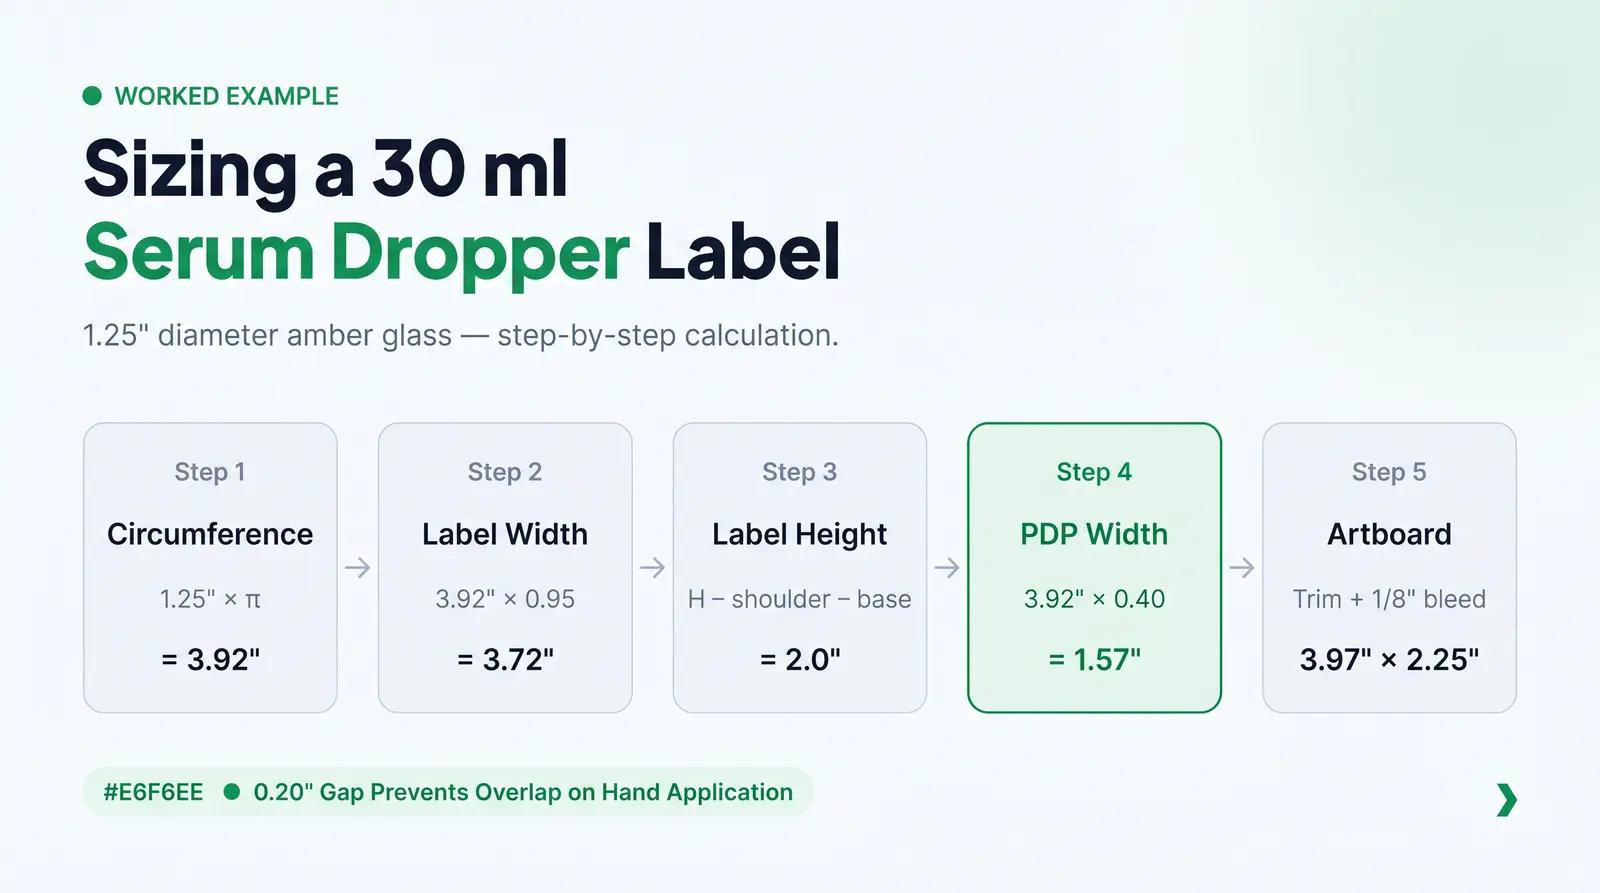
Worked Example: Sizing a 30 ml Serum Dropper Label
A founder is launching a 1 oz (30 ml) vitamin C serum in a 30 ml amber glass dropper bottle with a 1.25 in (31.8 mm) diameter. She needs to determine label dimensions, configure the dieline, and allocate regulatory panels before briefing her designer.
Step 1: Circumference. 1.25 in × 3.14 = 3.92 in (99.6 mm).
Step 2: Label width at 95% wrap. 3.92 in × 0.95 = 3.72 in (94.5 mm). This leaves a 0.20 in (5.1 mm) gap where the label ends meet, preventing overlap issues during hand application.
Step 3: Label height. The bottle has an overall height of 3.35 in (85.2 mm) [4]. Subtracting the shoulder taper (approximately 0.5 in / 12.7 mm) and the base margin (approximately 0.25 in / 6.4 mm), the maximum printable height is 2.0 in (50.8 mm).
Step 4: PDP panel width. Under 21 CFR § 701.10, the PDP for a cylindrical container is defined as 40% of the circumference [12]. PDP width = 3.92 in × 0.40 = 1.57 in (39.9 mm). This is the panel where the product name and net quantity must appear.
Step 5: Dieline dimensions. Trim line: 3.72 in × 2.0 in. Safe zone (1/8 in inside trim): 3.47 in × 1.75 in. Bleed (1/8 in outside trim): artboard size 3.97 in × 2.25 in.
Step 6: Regulatory allocation. The 1.57 in PDP panel carries the product name and net quantity (positioned in the lower 30% of the PDP height, i.e., the lower 0.6 in of the label). The remaining panel width (3.72 in minus 1.57 in = 2.15 in) is available for the ingredient list, manufacturer address, and any required warning statements.
Packfolio's catalog SKUs each come with predefined printable regions already mapped to the container geometry, so the label width, height, and safe-zone constraints are built into the 3D design tool—founders see exactly how their artwork wraps the container before ordering.
Label sizing is a geometry problem first, a design problem second. Confirm the container, calculate the circumference, set the dieline, allocate the regulatory panels, and only then brief the designer.
Browse Packfolio's cosmetic packaging catalog, where every SKU includes predefined print zones and a 3D label preview before you order: https://packfolio.com/catalog
Frequently Asked Questions
How do I calculate the label size for a round cosmetic bottle? Measure the bottle's diameter, then multiply by π (3.14) to find the circumference. Multiply the circumference by 0.95 for a wraparound label with a small gap, or by 1.0 for a full overlap. The label height is determined by measuring the flat, printable surface between the shoulder curve and the base curve.
What is a dieline in cosmetic packaging? A dieline is a vector outline that defines the exact shape and size of a label before it is printed and cut. It includes the trim line (where the label is cut), the bleed area (artwork extension beyond the trim), and the safe zone (the inner margin where all critical content must remain).
What is the standard label size for a 1 oz serum bottle? A standard 1 oz (30 ml) Boston round dropper bottle with a 1.25 in (31.8 mm) diameter typically accommodates a label approximately 1.5 in to 2.0 in high by 3.72 in to 3.92 in wide, depending on the desired wrap overlap and shoulder clearance.
What file format should I use for a cosmetic label dieline? Dielines should be provided in vector formats: PDF, AI (Adobe Illustrator), or EPS. These formats maintain crisp, scalable lines and accurate dimensions for print production. Raster formats such as JPEG or PNG are not suitable for dielines.
How much bleed do I need on a cosmetic label? The industry standard for label bleed is 1/8 in (0.125 in or 3.175 mm) on all sides [1]. This ensures the background color or design extends beyond the trim line to prevent white edges if the cut is slightly off-register.
References
[1] Essential Tips for Using Artwork Bleeds in Label Printing. Lightning Labels. 2024. https://www.lightninglabels.com/blog/essential-tips-artwork-bleeds-label-printing/
[2] What Are Bleed, Trim, and Safe Area in Printing? PrintsWell. 2026. https://www.printswell.com/blog/what-are-bleed-trim-and-safe-area-in-printing
[3] How to Measure a Bottle + Label Size Calculator. Consolidated Label. 2015. https://consolidatedlabel.com/label-articles/measure-bottle/
[4] What Are the Standard Dimensions of 30ml Dropper Bottles. Cosmetic Packing. 2025. https://www.cosmeticpacking.com/30ml-dropper-bottle-dimensions-specifications-packaging-shipping/
[5] Cosmetics Labeling Guide. U.S. Food and Drug Administration. 2022. https://www.fda.gov/cosmetics/cosmetics-labeling-regulations/cosmetics-labeling-guide
[6] How to Create Professional 2oz Jar Labels. Dashleigh. 2025. https://dashleigh.com/blogs/dashleigh-lifestyle/definitive-guide-to-create-professional-2oz-jar-labels
[7] 8OZ Empty Plastic Pump Lotion Bottles with Pump Dispenser. Amazon. https://www.amazon.com/Plastic-Bottles-Silicone-Dispenser-ZMYBCPACK/dp/B07QWP84V7
[8] Summary of Cosmetics Labeling Requirements. U.S. Food and Drug Administration. 2025. https://www.fda.gov/cosmetics/cosmetics-labeling-regulations/summary-cosmetics-labeling-requirements
[9] Squeeze Tubes and Cosmetic Tubes. The Whole Package, LLC. https://thewholepkg.com/tube-sales
[10] Round PP Airless Pump Bottle with Round Bottom 30ml 50ml 100ml. GlowPaks. https://www.glowpaks.com/product/round-pp-airless-pump-bottle-with-round-bottom-30ml-50ml-100ml/
[11] Digital vs. Flexographic Printing: Which is Right for Your Labels? Blue Label Packaging. https://www.bluelabelpackaging.com/blog/digital-vs-flexo-printing-which-is-right-for-your-labels/
[12] 21 CFR § 701.10 — Principal Display Panel. Legal Information Institute, Cornell Law School. https://www.law.cornell.edu/cfr/text/21/701.10


