
Cosmetic Label Sizes for Bottles, Jars, and Tubes
This guide explains how to measure cosmetic containers, calculate label dimensions, meet FDA labeling requirements, and avoid adhesion failures for bottles, jars, and tubes.
Label size is the exact point where brand design, packaging geometry, and compliance text collide. It is not a detail you finalize after the artwork is done. It is a decision that shapes the artwork itself, determines how much regulatory copy you can fit, and controls whether the label survives six months in a humid bathroom.
For independent beauty brand founders, formulators, and contract manufacturers sourcing cosmetic primary packaging, getting the label size right is a critical early step. Get it wrong and you face reprints, adhesion failures, or an FDA misbranding risk. Get it right and your label looks intentional, reads clearly, and holds up in the real world.
This guide covers how to measure containers, calculate label dimensions, navigate the FDA's principal display panel rules, plan your compliance copy, and avoid the adhesion failures that show up after launch.
Why Label Size Is a Structural Decision, Not a Design Decision
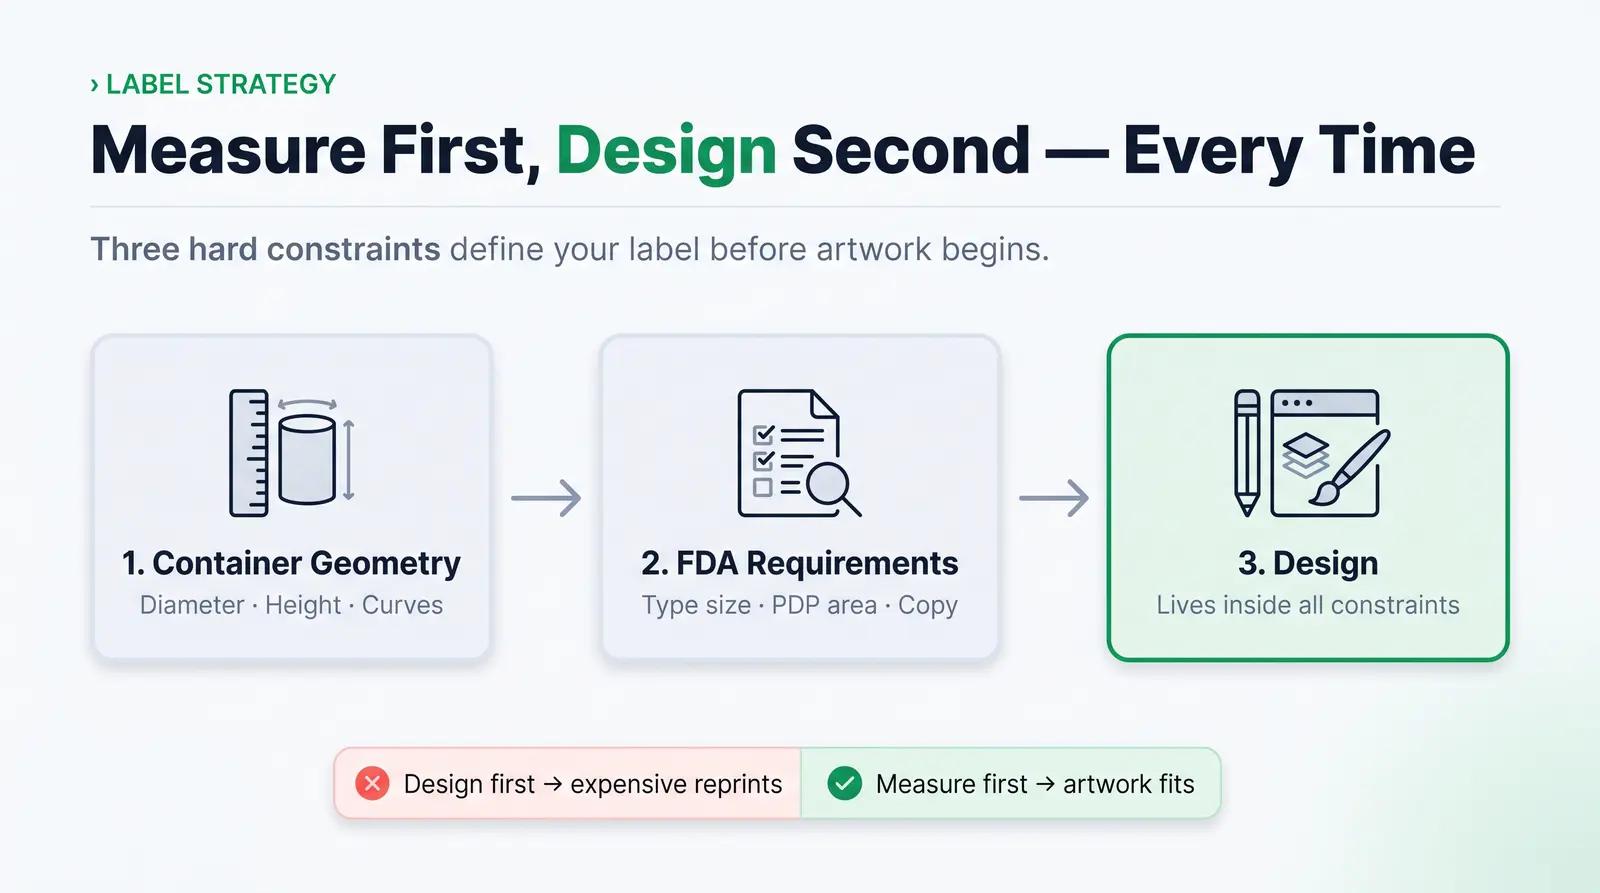
Most founders approach label sizing from the design side: they create artwork, then try to fit it onto the container. The process should run in the opposite direction.
The container's geometry sets hard limits on label dimensions. The FDA's labeling regulations set hard limits on type size and content. The production process sets hard limits on bleed, safe zones, and adhesive performance. Design lives inside all three of those constraints.
Starting with the container dimensions and working inward is the only sequence that avoids expensive revisions. A label that looks beautiful in a mockup but wraps too far around a narrow serum bottle will flag at the edges on the shelf. A label that fills every millimeter of available space will have no room for a safe zone, meaning the ingredient list risks being cut off during die-cutting.
The practical implication: before you open a design file, measure your container, calculate the printable area, and map out the compliance copy requirements. Then design.
How to Measure Your Container for Label Sizing
Every container type requires a slightly different measurement approach.
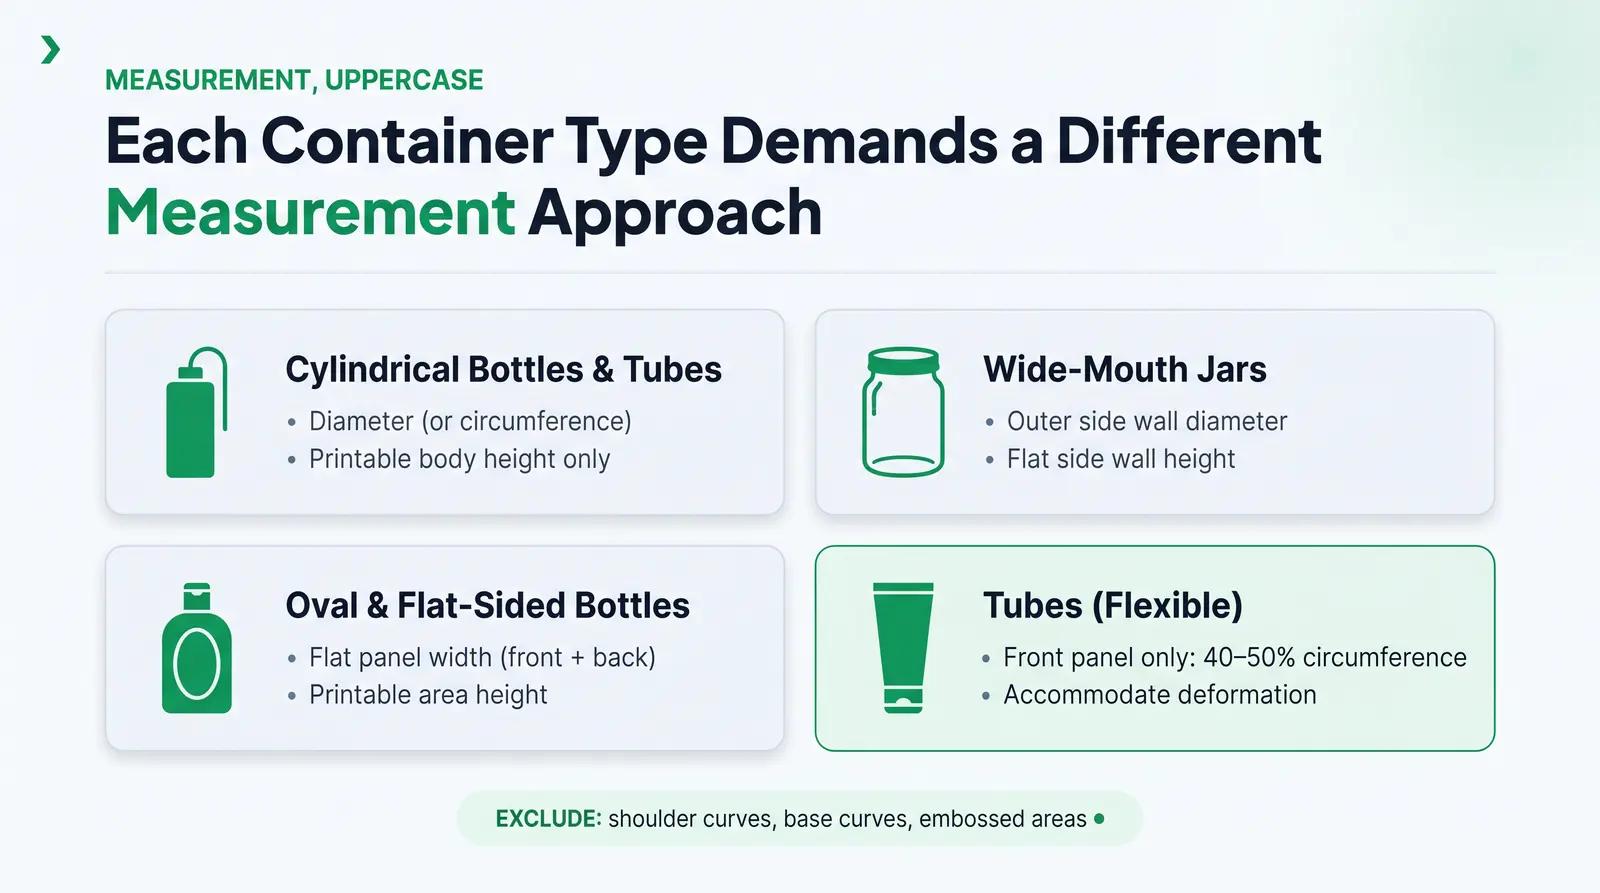
Cylindrical bottles and tubes require two measurements: the diameter (or the circumference directly, using a flexible tape measure) and the printable body height. The printable body height is not the total bottle height. It excludes the shoulder curve at the top, the base curve at the bottom, and any embossed or textured areas where adhesion is unreliable.
Wide-mouth jars require the outer diameter of the side wall and the height of the flat side wall. The lid and the base are typically excluded from the label area because the label needs to clear the lid thread and the base curve.
Oval and flat-sided bottles require the width of the flat panel (front and back) and the height of the printable area. These containers are often labeled with a front panel and a back panel rather than a single wrap-around label.
Tubes are flexible and compress during use, which creates specific challenges. Labels on tubes need to accommodate deformation. Most brands use a front panel label that covers 40% to 50% of the circumference, leaving the back and sides unlabeled or using a secondary printed area on the tube itself.
Once you have these measurements, you can calculate the maximum label dimensions and work backward to your safe zone and bleed requirements.
The Label Real Estate Framework
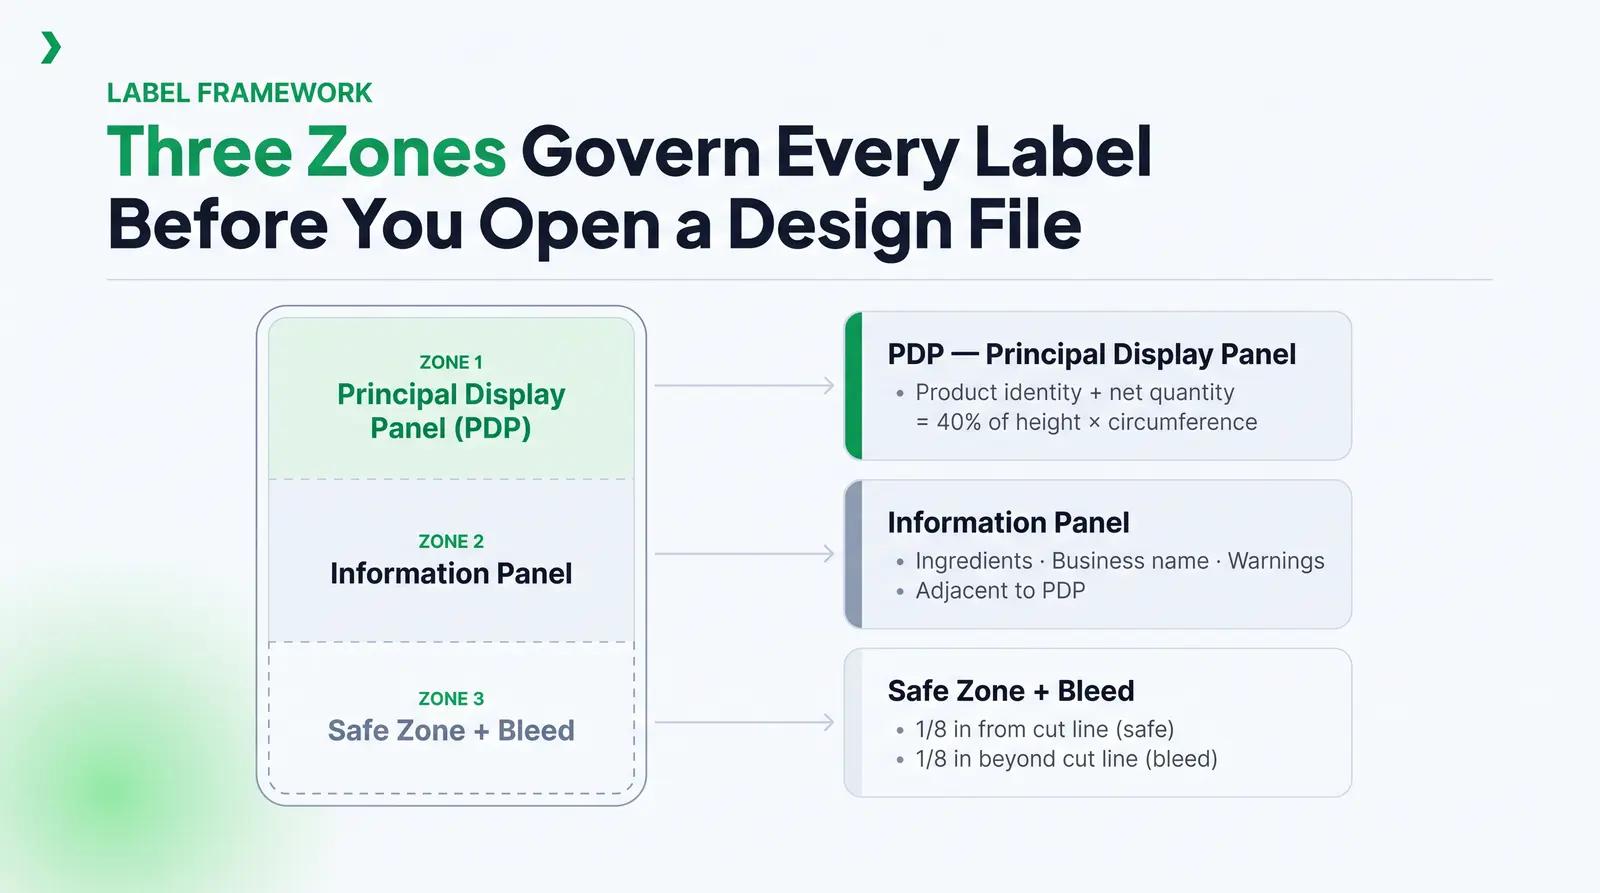
The Label Real Estate Framework is a practical way to divide the available label surface into three functional zones before you begin designing. It is not a formal system or a validated methodology. It is a working mental model that helps founders allocate space before committing to artwork.
Zone 1: The Principal Display Panel (PDP)
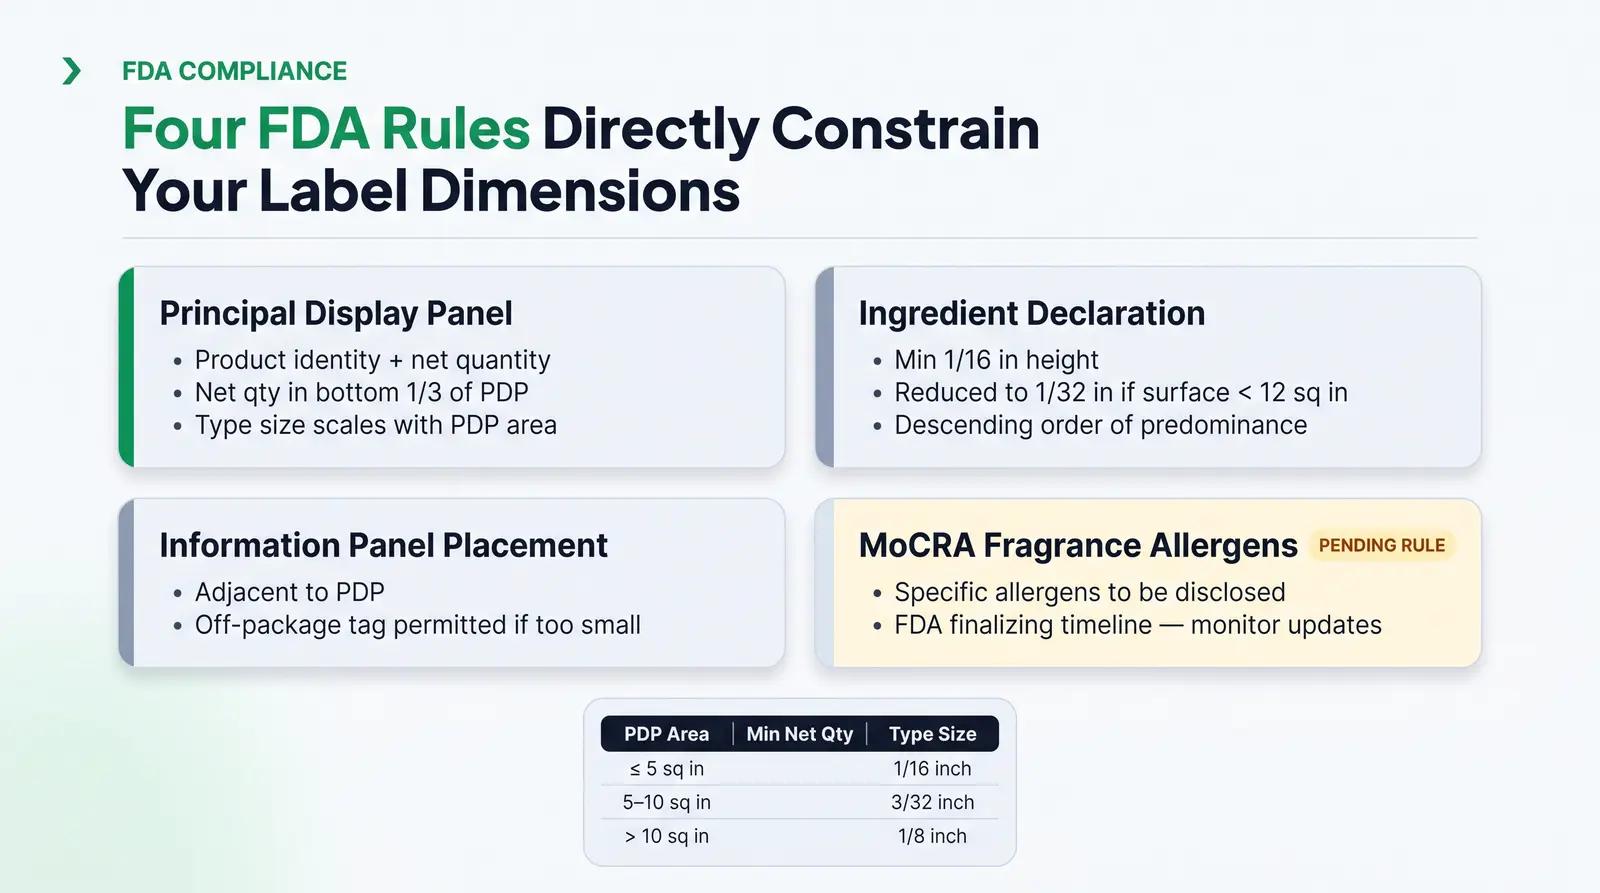
The PDP is the portion of the label most likely to be displayed or examined under customary conditions of sale [1]. Under FDA regulations, the PDP must state the product identity (name and descriptive nature or use) and the net quantity of contents [1]. The net quantity statement must appear in the bottom third of the PDP, parallel to the base of the package.
The FDA defines the PDP area for cylindrical containers as 40% of the product of the height and circumference of the container [1]. For other container shapes, the PDP is 40% of the total surface area, excluding the top, bottom, neck, shoulder, and flanges [1]. This calculated area determines the minimum type size for the net quantity declaration.
Zone 2: The Information Panel
The information panel is any panel adjacent to the PDP. This is where the ingredient declaration, the name and place of business, the country of origin (for imported products), and any required warnings live. The information panel can be on the back of the container, on a side panel, or on a firmly affixed tag, tape, or card if the container surface is too small to accommodate the declaration [2].
Zone 3: The Safe Zone and Bleed Area
The safe zone is the area inside the label's cut line where all critical design elements must remain. Standard practice is to keep text and logos at least 1/8 inch (0.125 inches) from the cut line. The bleed area extends beyond the cut line, typically by 1/8 inch, to ensure background colors and images print to the edge without white borders appearing after die-cutting.
For cylindrical containers, the safe zone also needs to account for the label's leading and trailing edges. If the label wraps around the container, the edges are the most vulnerable points for adhesion failure and edge lift.
Container Dimensions and Label Sizing Reference
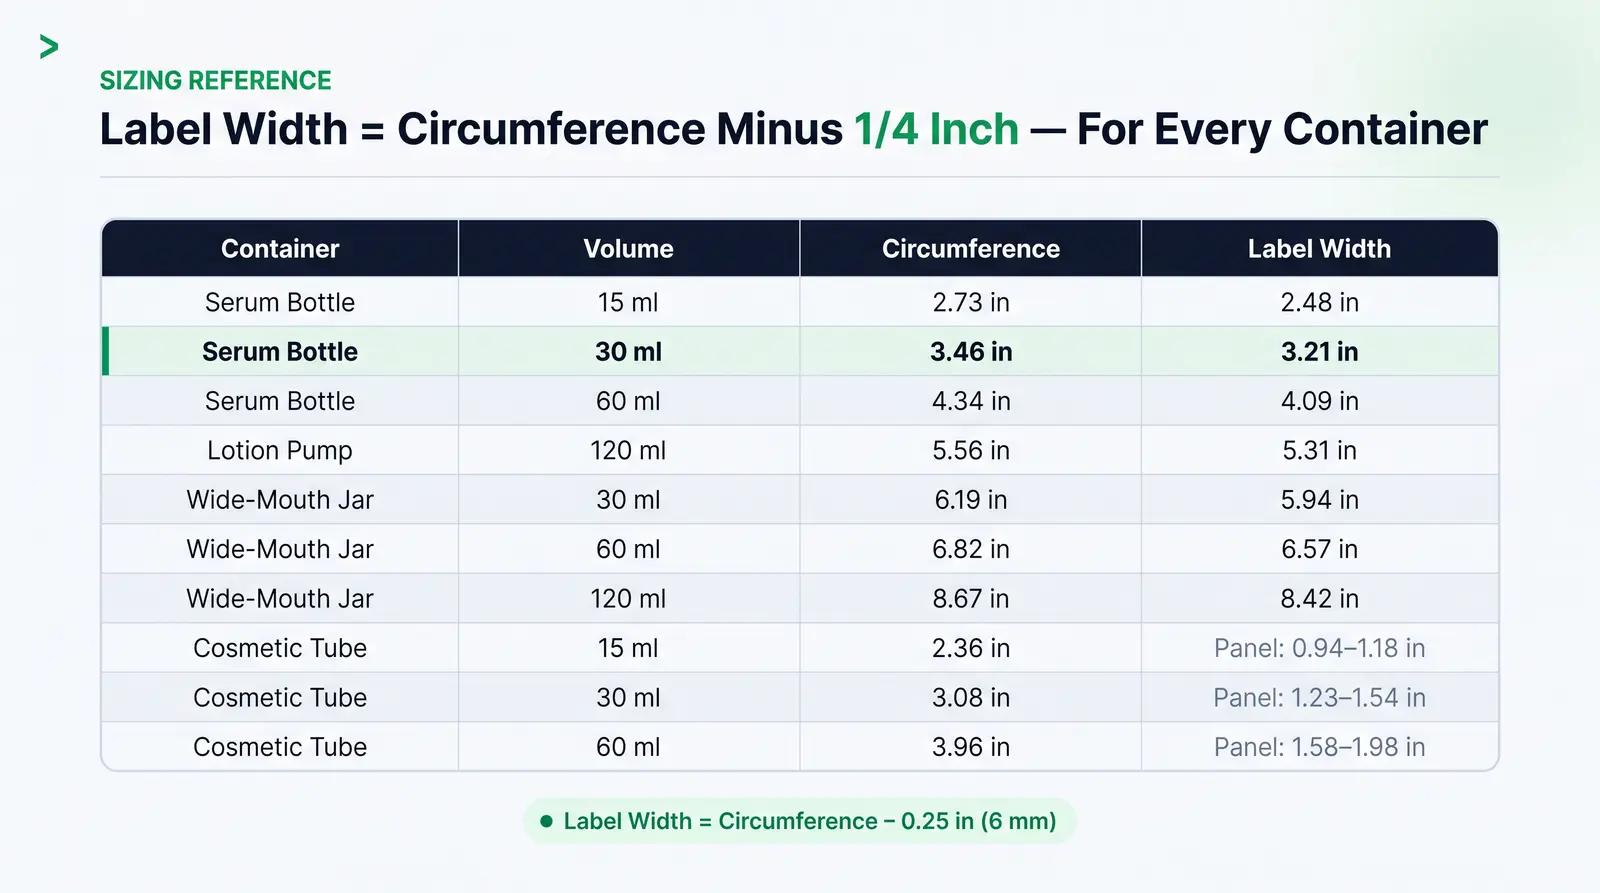
The following table provides typical dimensions for common cosmetic containers and the recommended label widths based on the standard 1/4-inch (6 mm) gap rule. These are representative dimensions based on widely available packaging SKUs. Always measure your specific container before finalizing artwork.
| Container Type | Fill Volume | Typical Diameter | Circumference | Recommended Label Width |
|---|---|---|---|---|
| Serum/Dropper Bottle | 0.5 oz (15 ml) | 0.87 in (22 mm) | 2.73 in (69 mm) | 2.48 in (63 mm) |
| Serum/Dropper Bottle | 1 oz (30 ml) | 1.10 in (28 mm) | 3.46 in (88 mm) | 3.21 in (82 mm) |
| Serum Bottle | 2 oz (60 ml) | 1.38 in (35 mm) | 4.34 in (110 mm) | 4.09 in (104 mm) |
| Lotion/Pump Bottle | 4 oz (120 ml) | 1.77 in (45 mm) | 5.56 in (141 mm) | 5.31 in (135 mm) |
| Wide-Mouth Jar | 1 oz (30 ml) | 1.97 in (50 mm) | 6.19 in (157 mm) | 5.94 in (151 mm) |
| Wide-Mouth Jar | 2 oz (60 ml) | 2.17 in (55 mm) | 6.82 in (173 mm) | 6.57 in (167 mm) |
| Wide-Mouth Jar | 4 oz (120 ml) | 2.76 in (70 mm) | 8.67 in (220 mm) | 8.42 in (214 mm) |
| Cosmetic Tube | 0.5 oz (15 ml) | 0.75 in (19 mm) | 2.36 in (60 mm) | Panel: 0.94-1.18 in (24-30 mm) |
| Cosmetic Tube | 1 oz (30 ml) | 0.98 in (25 mm) | 3.08 in (78 mm) | Panel: 1.23-1.54 in (31-39 mm) |
| Cosmetic Tube | 2 oz (60 ml) | 1.26 in (32 mm) | 3.96 in (101 mm) | Panel: 1.58-1.98 in (40-50 mm) |
For jar labels, the label height is typically the flat side wall height minus 1/8 inch clearance at the top and bottom. For tube panel labels, the recommended width is 40% to 50% of the circumference to accommodate flexing during use.
Worked Example: Sizing a 1 oz Serum Bottle Label
A 1 oz (30 ml) cylindrical glass serum bottle is one of the most common containers in the premium skincare segment. Here is a step-by-step label sizing calculation for this container.
Container measurements:
- Diameter: 1.10 inches (28 mm)
- Circumference: 3.46 inches (88 mm)
- Total bottle height: 3.25 inches (83 mm)
- Printable body height (excluding shoulder and base curves): 2.0 inches (51 mm)
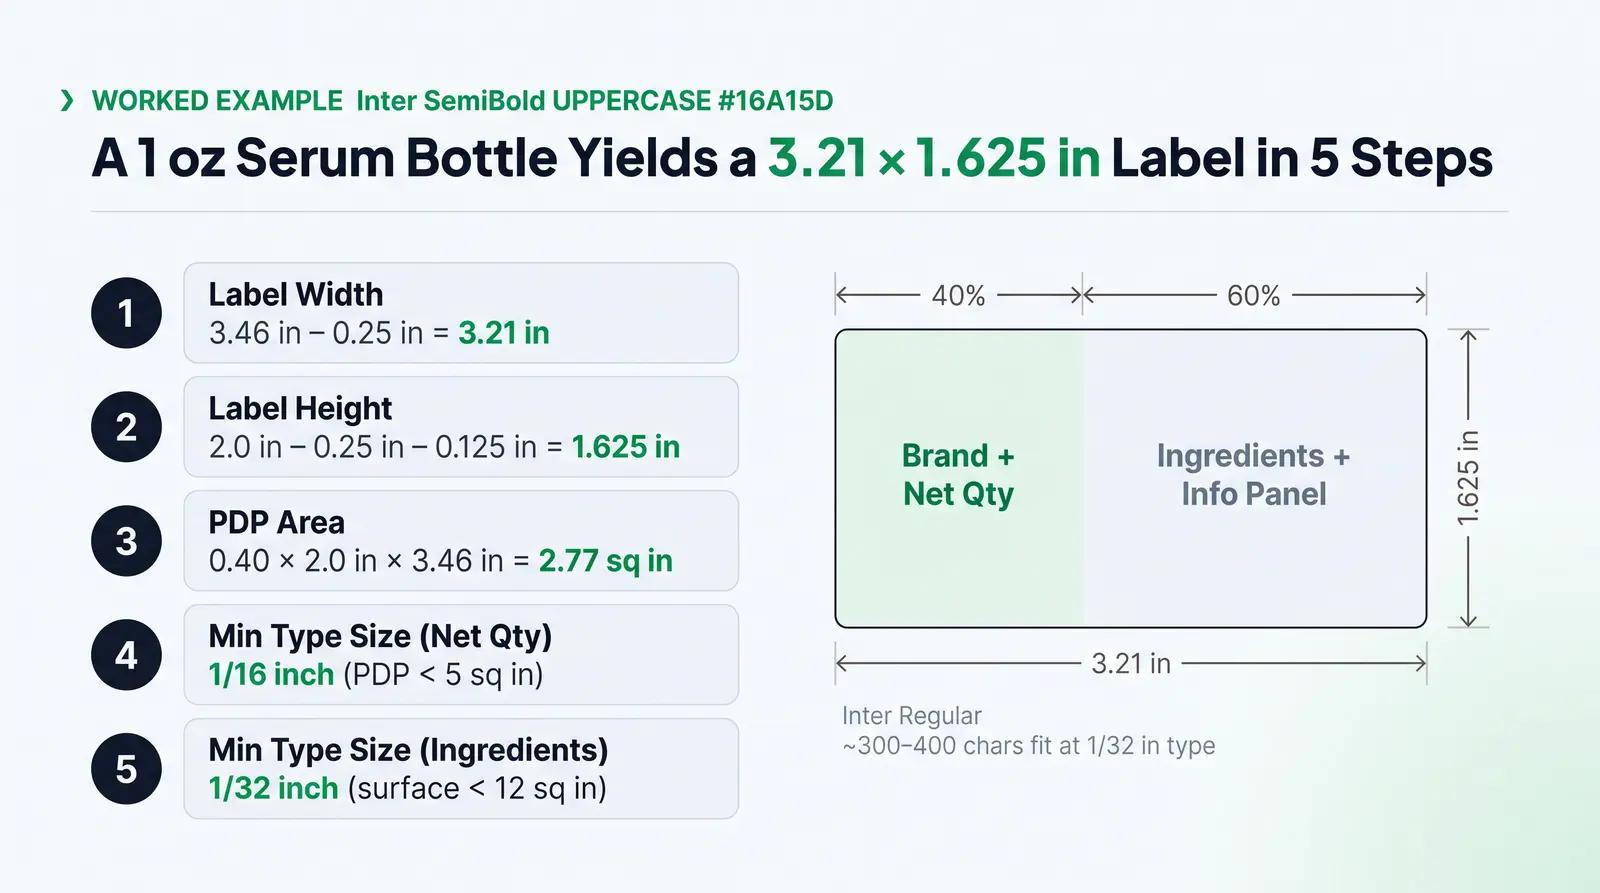
Step 1: Calculate the label width. Subtract the 1/4-inch gap from the circumference to prevent flagging. Label width = 3.46 in - 0.25 in = 3.21 inches (82 mm).
Step 2: Calculate the label height. Subtract a 1/4-inch clearance at the shoulder and a 1/8-inch clearance at the base from the printable body height. Label height = 2.0 in - 0.25 in - 0.125 in = 1.625 inches (41 mm).
Step 3: Calculate the PDP area. For a cylindrical container, the FDA defines the PDP as 40% of the height multiplied by the circumference [1]. PDP area = 0.40 x 2.0 in x 3.46 in = 2.77 square inches. Because the PDP area is less than 5 square inches, the minimum type size for the net quantity declaration is 1/16 inch [1].
Step 4: Determine the ingredient declaration type size. The total package surface available for labeling is approximately the circumference multiplied by the total bottle height (3.46 in x 3.25 in = 11.25 square inches). Because this total surface area is less than 12 square inches, the FDA permits the ingredient declaration type size to be reduced to a minimum of 1/32 inch [2].
Step 5: Allocate the label zones. With a label measuring 3.21 in x 1.625 in, the total label area is approximately 5.22 square inches. A practical allocation for a serum bottle at this size:
- PDP (front-facing zone): approximately 40% of label width, full label height. This is where the product name, brand identity, and net quantity live.
- Information panel (back-facing zone): approximately 60% of label width, full label height. This holds the ingredient list, name and place of business, and any warnings.
At 1/32-inch type size, a 1.93-inch-wide information panel can accommodate approximately 300 to 400 characters of ingredient text, which is sufficient for most skincare formulations.
FDA Labeling Requirements That Affect Label Size
Understanding the FDA's labeling requirements is not optional. A cosmetic that does not comply with labeling regulations is considered misbranded under the Federal Food, Drug, and Cosmetic Act and is subject to regulatory action [1].
The key requirements that directly affect label sizing decisions are:
Principal Display Panel requirements. The PDP must state the product identity and the net quantity of contents. The net quantity statement must be in the bottom third of the PDP, parallel to the base of the package, and in a type size commensurate with the size of the container [1]. The minimum type sizes are set by the PDP area: 1/16 inch for PDP areas of 5 square inches or less, scaling up for larger containers.
Ingredient declaration requirements. The ingredient declaration must appear in letters not less than 1/16 inch in height [2]. For packages with a total surface area of less than 12 square inches, the minimum type size is reduced to 1/32 inch [2]. Ingredients must be listed in descending order of predominance, with color additives and ingredients at 1% or less permitted to be listed in any order after the main ingredients [2].
Information panel placement. The information panel must be adjacent to the PDP. If the container is too small to accommodate the ingredient declaration, the declaration may appear on a firmly affixed tag, tape, or card [2].
MoCRA fragrance allergen disclosure. The Modernization of Cosmetics Regulation Act of 2022 (MoCRA) requires the FDA to issue regulations mandating the disclosure of specific fragrance allergens on cosmetic labels [3]. The FDA is currently finalizing the rule, and the implementation timeline is still being determined [4]. Brands should monitor FDA guidance and plan to update ingredient declarations when the rule is finalized.
Adhesion Science: Why Label Size Affects Performance
The relationship between label size and adhesion performance is more direct than most founders realize. Label size affects how the adhesive interacts with the container surface, how the label material responds to curvature, and how the label holds up over time in a bathroom environment.
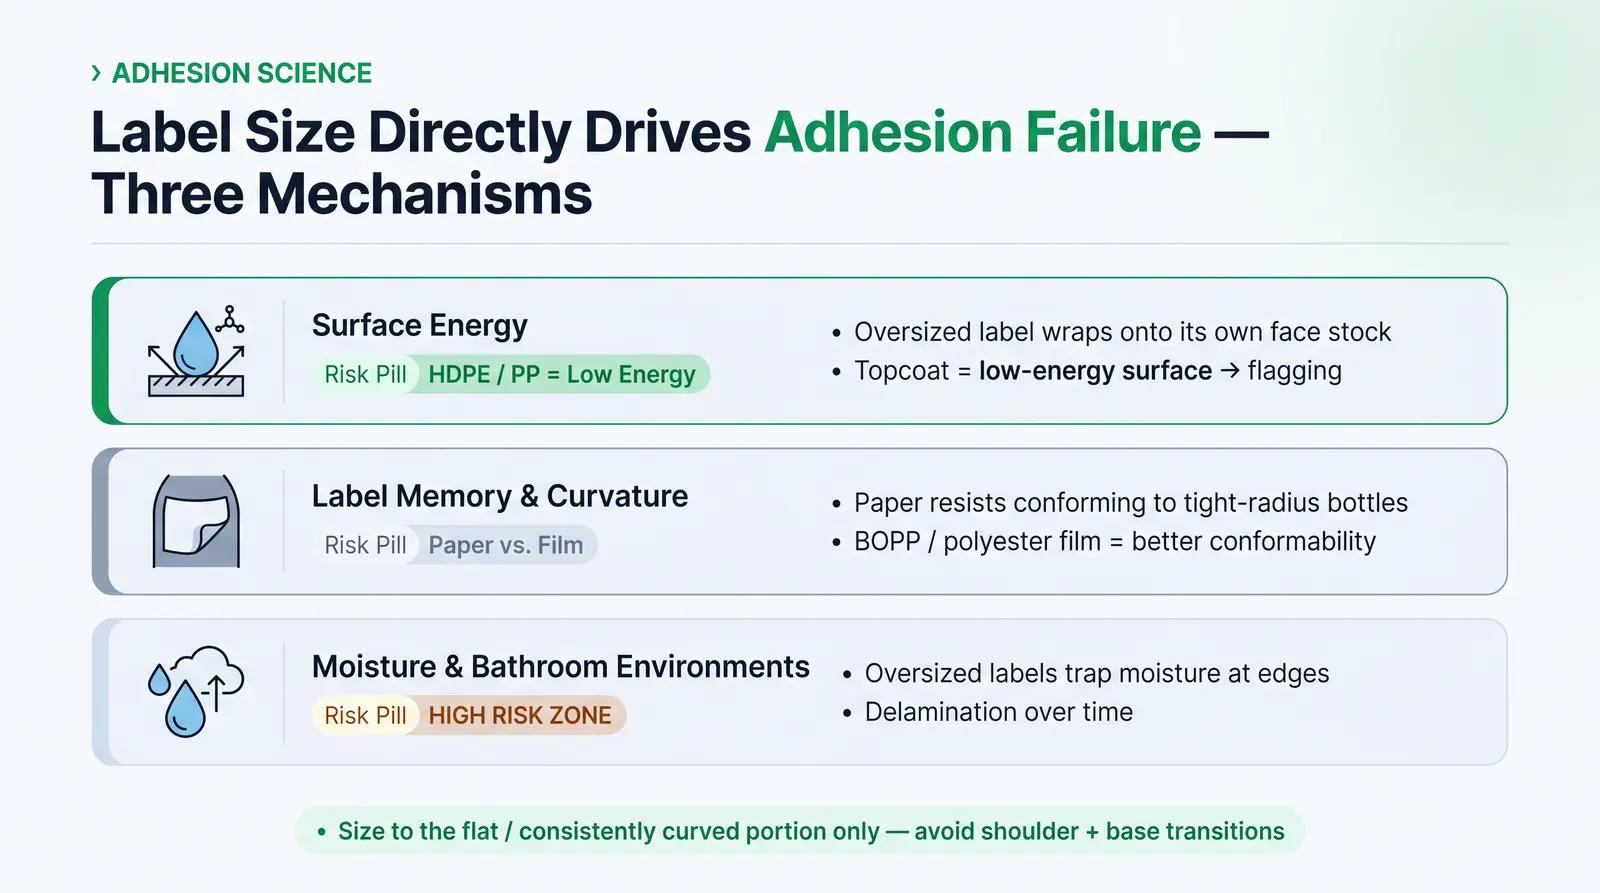
Surface energy and adhesion. Adhesives bond by wetting out the container surface. High-energy surfaces like glass and metal provide excellent adhesion. Plastics vary: HDPE and PP are low-surface-energy materials that require a high-tack adhesive to achieve reliable bonding [5]. When a label is too large and wraps over its own face stock, the adhesive is bonding to the label's topcoat, which is typically a low-energy surface. This is the primary cause of flagging.
Label memory and curvature. Paper-based face stocks have a memory that resists conforming to curved surfaces. When a paper label is applied to a small-diameter bottle, the paper's natural tendency to lie flat creates stress at the edges, pulling the adhesive away from the surface. Film-based face stocks like BOPP and polyester are more conformable and perform better on tight-radius containers [5].
Moisture and bathroom environments. Cosmetic products are used in bathrooms, where humidity is high and the container surface is frequently wet. Labels in these environments need a moisture-resistant adhesive and a face stock that does not absorb water. Oversized labels that extend into the shoulder or base curves are more likely to trap moisture and delaminate over time.
The practical rule: size your label to fit the flat or consistently curved portion of the container. Avoid extending the label into shoulder transitions, base curves, or embossed areas.
Label Sizing for Specific Container Types
Bottles
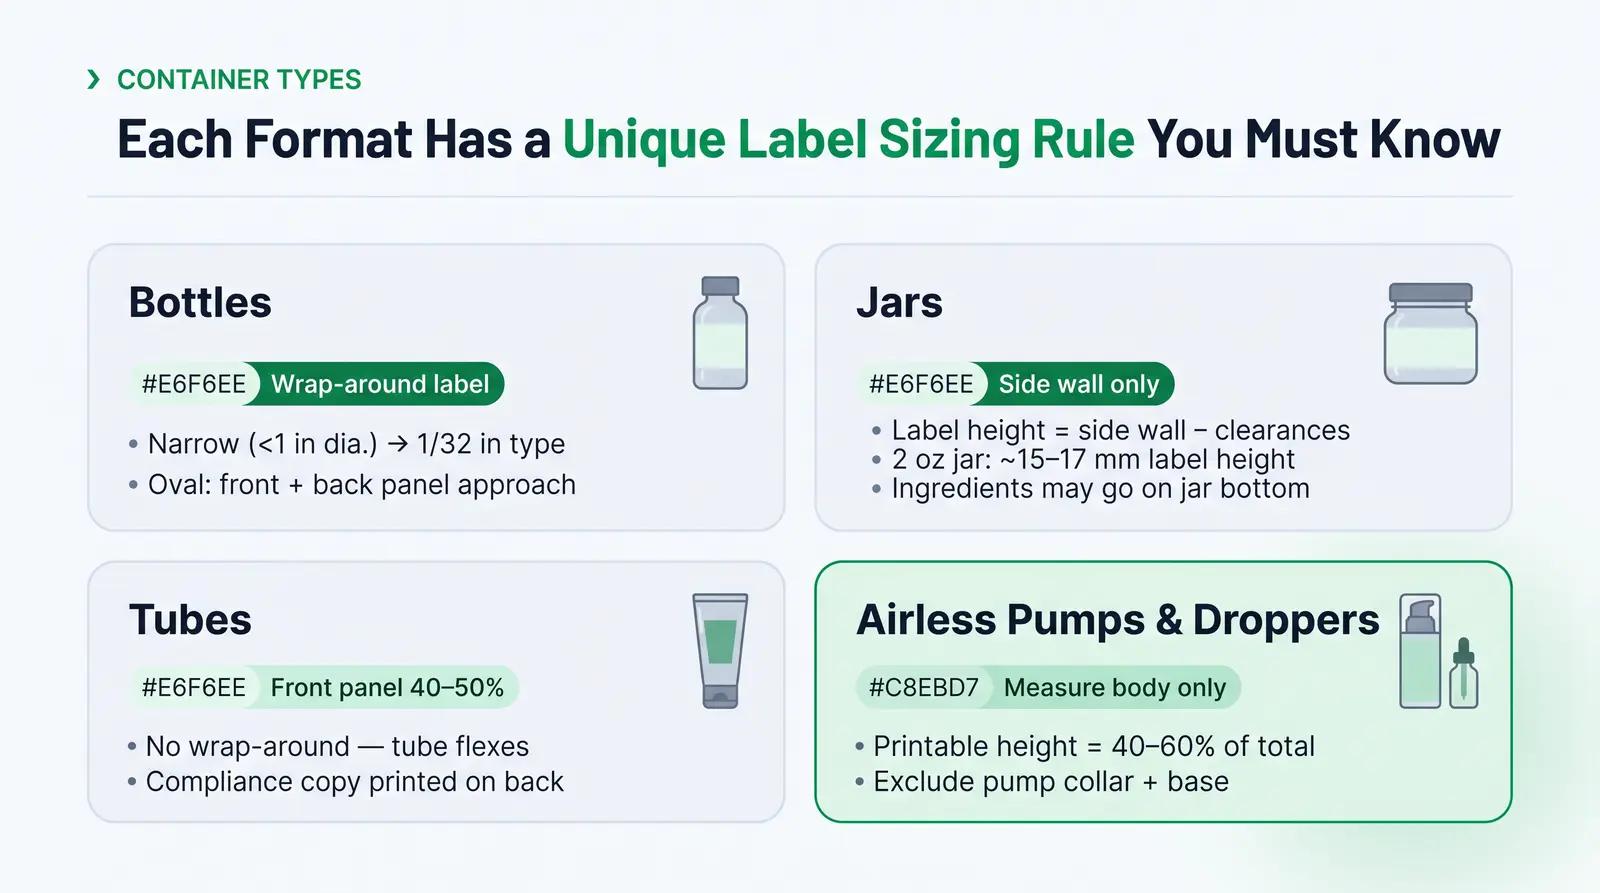
Cylindrical bottles are the most common format in premium skincare. The key sizing variable is the diameter, which determines the circumference and therefore the maximum label width. Narrow bottles (under 1 inch in diameter) have very limited label real estate and often require 1/32-inch type size for the ingredient declaration.
For oval bottles, the front and back panels are typically flat or nearly flat, which simplifies label sizing. The label width is the flat panel width minus a small margin on each side. Front-and-back label configurations are common for oval bottles because they allow separate design treatment for the PDP and the information panel.
Jars
Wide-mouth jars present a different sizing challenge. The label wraps around the side wall, and the height is limited by the lid thread clearance at the top and the base curve at the bottom. For a standard 2 oz (60 ml) wide-mouth jar with a 55 mm diameter and a 20 mm side wall height, the label height is typically 15 to 17 mm after accounting for clearances.
This limited height means that the information panel on a jar label is often very narrow. Many brands address this by placing the ingredient declaration on the bottom of the jar or on a separate inner carton. The FDA permits off-package ingredient labeling in specific circumstances, including when the package surface area is less than 12 square inches and the product is displayed in a tightly compartmented rack [2].
Tubes
Cosmetic tubes are flexible and compress during use. A full wrap-around label on a tube will wrinkle and crack as the tube is squeezed. The standard approach is a front panel label that covers 40% to 50% of the circumference, leaving the back and sides as a printed or plain surface.
For tubes, the label height is more generous than the width, because tubes are typically taller than they are wide. The compliance copy (ingredient list, name and place of business) often runs vertically along the back of the tube as a printed element rather than a separate label.
Airless Pumps and Droppers
Airless pump bottles and dropper bottles have a narrow body diameter and a significant portion of the total height taken up by the pump mechanism or dropper assembly. The printable body height is often only 40% to 60% of the total bottle height. Measure the body height carefully, excluding the pump collar and the base.
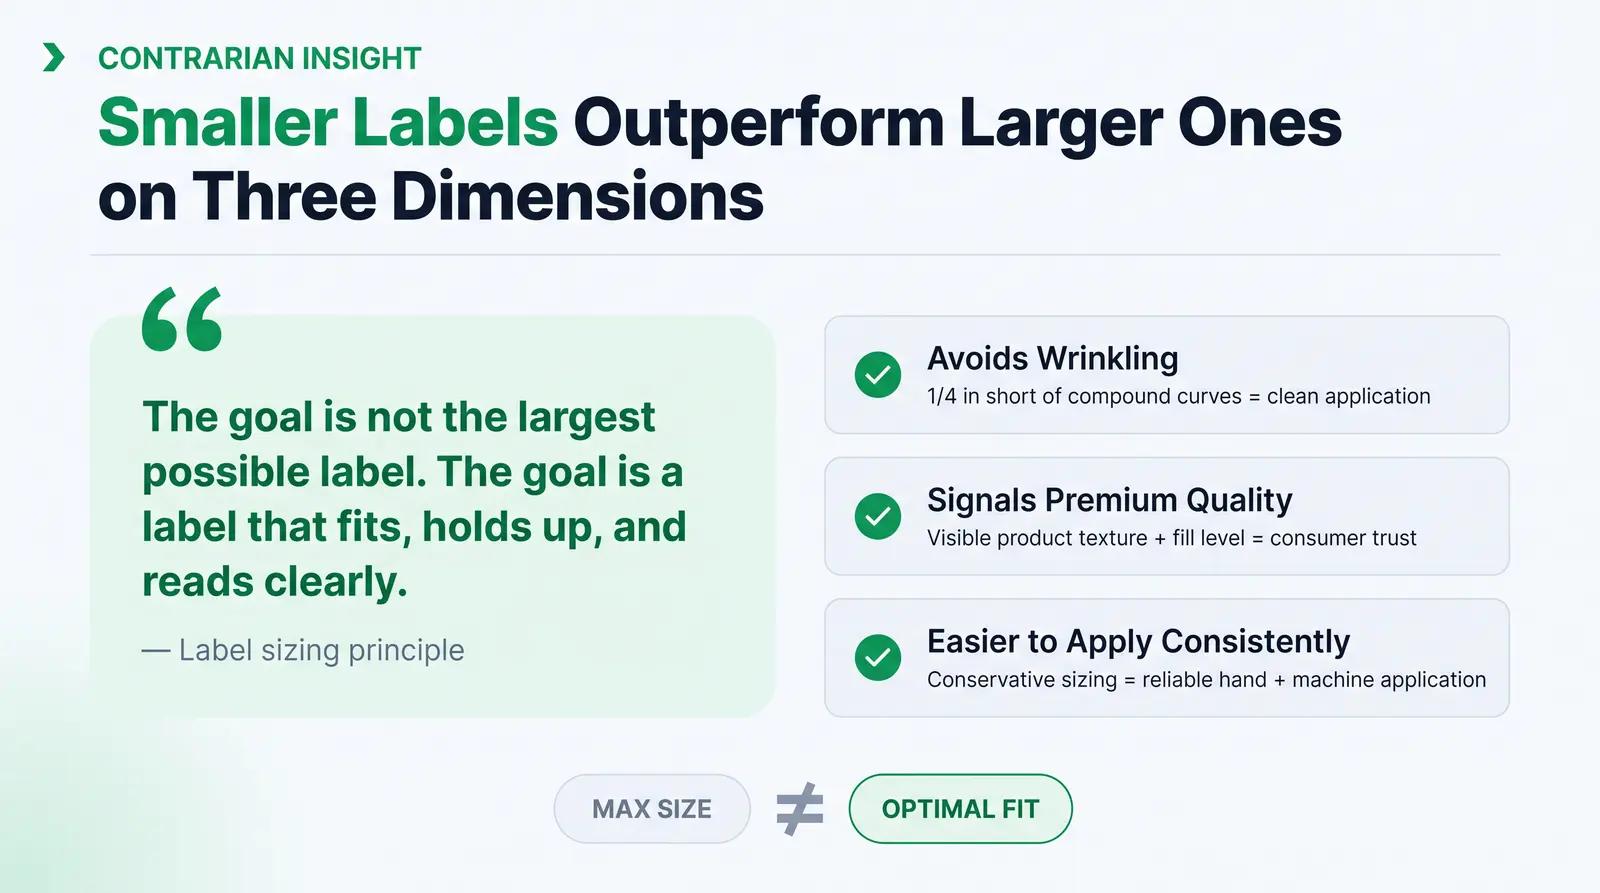
The Contrarian Insight: Smaller Labels Often Outperform Larger Ones
The instinct is to maximize label size to maximize brand presence. The reality is more nuanced.
A label that stops 1/4 inch short of the container's compound curves avoids wrinkling during application. A label that leaves a visible gap allows consumers to see the product texture and fill level, which is a positive signal for premium skincare. A label that does not overlap itself has a cleaner edge and a more professional appearance.
There is also a production argument. Labels that are sized conservatively are easier to apply consistently, whether by hand or by machine. Oversized labels require more precise placement to avoid visible misalignment, and any misalignment is more obvious when the label extends close to the container's edges.
The goal is not the largest possible label. The goal is a label that fits the container's geometry, holds up in use, and gives the compliance copy enough room to be legible.
How Packfolio Handles Label Sizing
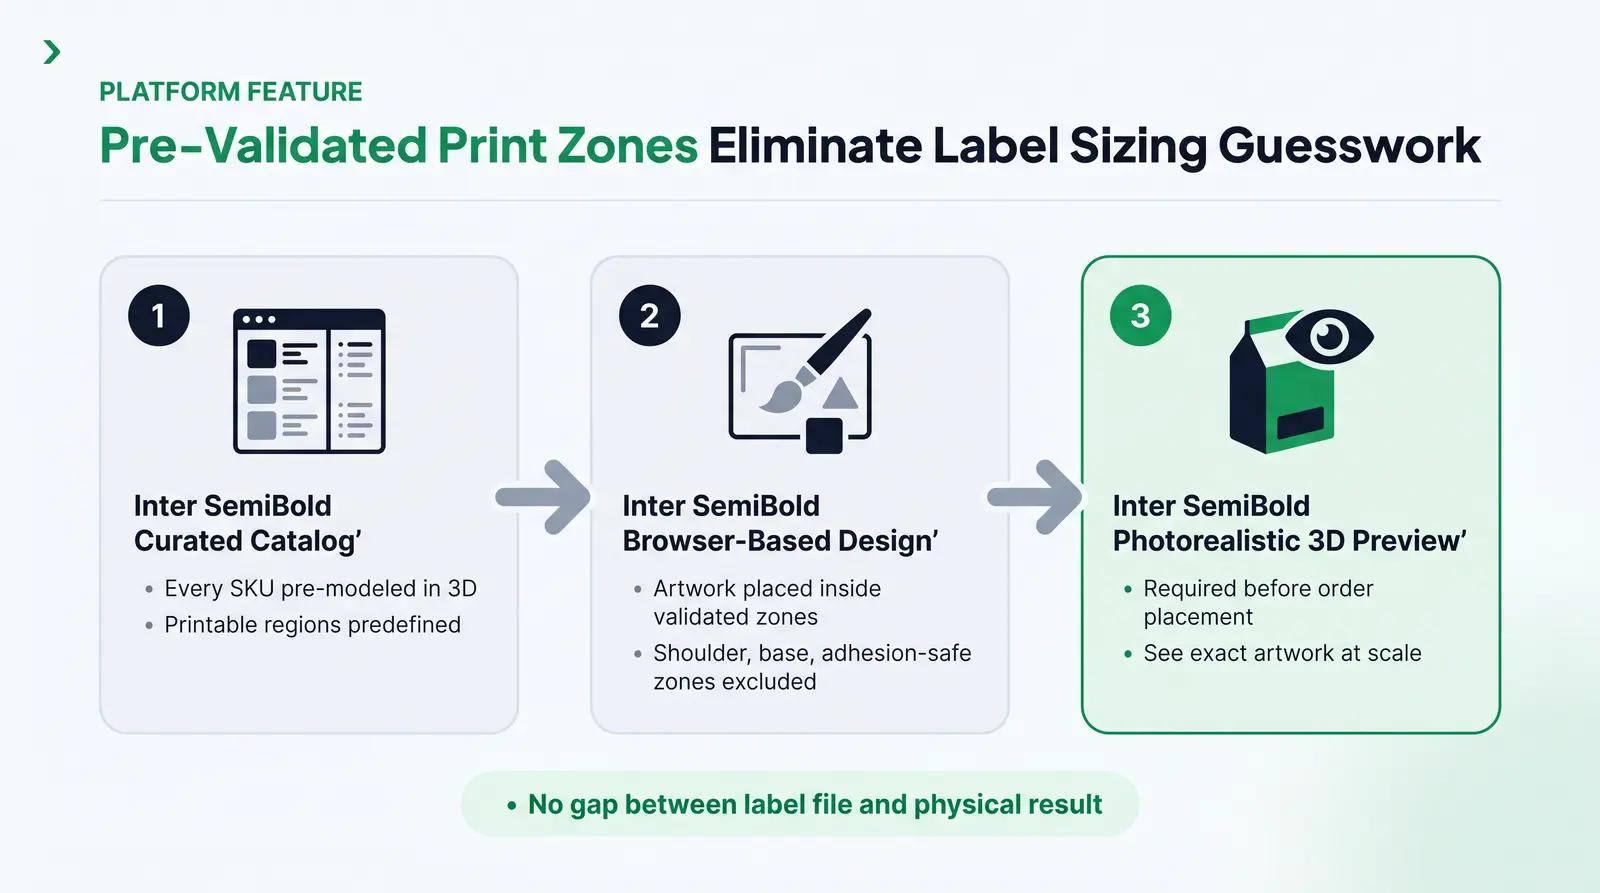
Packfolio offers a curated catalog of cosmetic primary packaging SKUs, each pre-modeled in 3D with predefined printable regions. The printable regions are set based on the container's actual geometry, accounting for shoulder curves, base curves, and adhesion-safe zones. When you customize artwork inside the predefined print zones using the browser-based 3D design tool, you are working within dimensions that have already been validated for the container.
The 3D preview step is a required part of the order flow. Before you place an order, you see exactly how your artwork sits on the container, at scale, in a photorealistic render. This eliminates the gap between the label file and the physical result that causes most label sizing mistakes.
If you are ready to build your next product line, browse the Packfolio catalog and start designing with containers that already know their label dimensions.
Frequently Asked Questions
What is the minimum type size for cosmetic ingredient declarations?
The FDA requires ingredient declarations to be in letters not less than 1/16 inch in height. If the total package surface available to bear labeling is less than 12 square inches, the minimum type size is reduced to 1/32 inch [1] [2]. For most small cosmetic containers, including 0.5 oz and 1 oz serum bottles, the 1/32-inch minimum applies.
How do I calculate the correct label width for a cylindrical bottle?
Measure the bottle's diameter and multiply by pi (3.14159) to get the circumference. Subtract 1/4 inch (6 mm) from the circumference to get the recommended label width. This gap prevents the label from overlapping onto its own face stock, which causes edge lift and flagging.
What is the principal display panel and how does it affect label sizing?
The principal display panel (PDP) is the portion of the label most likely to be displayed under customary conditions of sale. The FDA defines the PDP area for cylindrical containers as 40% of the height multiplied by the circumference. The PDP area determines the minimum type size for the net quantity of contents statement. A smaller PDP area means a smaller minimum type size is permitted [1].
How does MoCRA change cosmetic label requirements?
MoCRA, signed into law in December 2022, requires the FDA to issue regulations mandating the disclosure of specific fragrance allergens on cosmetic labels [3]. The FDA is still finalizing the rule and the implementation timeline [4]. Brands should monitor FDA guidance and plan to revise ingredient declarations when the final rule is published.
Can I put the ingredient list on the bottom of a jar instead of the side label?
The FDA permits off-package ingredient labeling in specific circumstances. If the package surface area is less than 12 square inches and the product is held in a tightly compartmented display rack, the ingredient declaration may appear on labeling attached to the display unit rather than on the package itself [2]. For most retail cosmetics, the ingredient declaration should appear on the container or on a firmly affixed tag, tape, or card.
References
[1] Summary of Cosmetics Labeling Requirements, U.S. Food and Drug Administration
[2] 21 CFR § 701.3 - Designation of Ingredients, Cornell Law School Legal Information Institute
[3] Modernization of Cosmetics Regulation Act of 2022 (MoCRA), U.S. Food and Drug Administration
[4] MoCRA Cosmetic Label Requirements: The Essential Guide, Registrar Corp
[5] What to Consider When Selecting a Pressure Sensitive Label Adhesive, Blue Label Packaging


